

Imagine holding your breath as you snap that first photo of your tiny newborn, their delicate features glowing under soft light. But when you review the image, harsh colors or uneven tones steal the magic. This is where newborn photo color correction steps in as a game-changer. It transforms raw shots into timeless keepsakes by ensuring skin looks natural and inviting. Soft, smooth tones refer to those gentle, even hues with subtle transitions—no sharp edges or bold contrasts—that evoke a sense of calm, warmth, and innocence. These tones pull at heartstrings, making viewers feel the tenderness of the moment.
For DIY editors tinkering at home, expect to use accessible tools like free apps or basic software to fix common flaws quickly. You’ll see noticeable improvements with practice, but results shine brightest when you start with good lighting. Photography businesses, on the other hand, rely on precise newborn photo color correction to deliver consistent, professional galleries that wow clients and build trust. Over my years in the field, I’ve seen how mastering this elevates portfolios and client loyalty. This guide dives into practical steps, drawing from real-world techniques to help you achieve those dreamy, airy results.
Understanding the Goal of Natural Skin Tones in Newborn Photos
Why Soft and Gentle Color Tones Work Best for Newborn Portraits
Harsh contrast in newborn photos often creates unflattering shadows that make a baby’s skin appear rough or uneven. Instead, opt for soft, gentle tones that blend seamlessly, fostering a peaceful vibe. These tones connect deeply with emotions, stirring feelings of calm and warmth that mirror the bond between parent and child. Viewers trust images that feel authentic, without exaggerated edges that scream “over-edited.” In practice, this approach keeps the focus on the baby’s innocence, turning portraits into cherished heirlooms.
Common Color Issues Found in Newborn Photography
Addressing these early prevents bigger edits later.
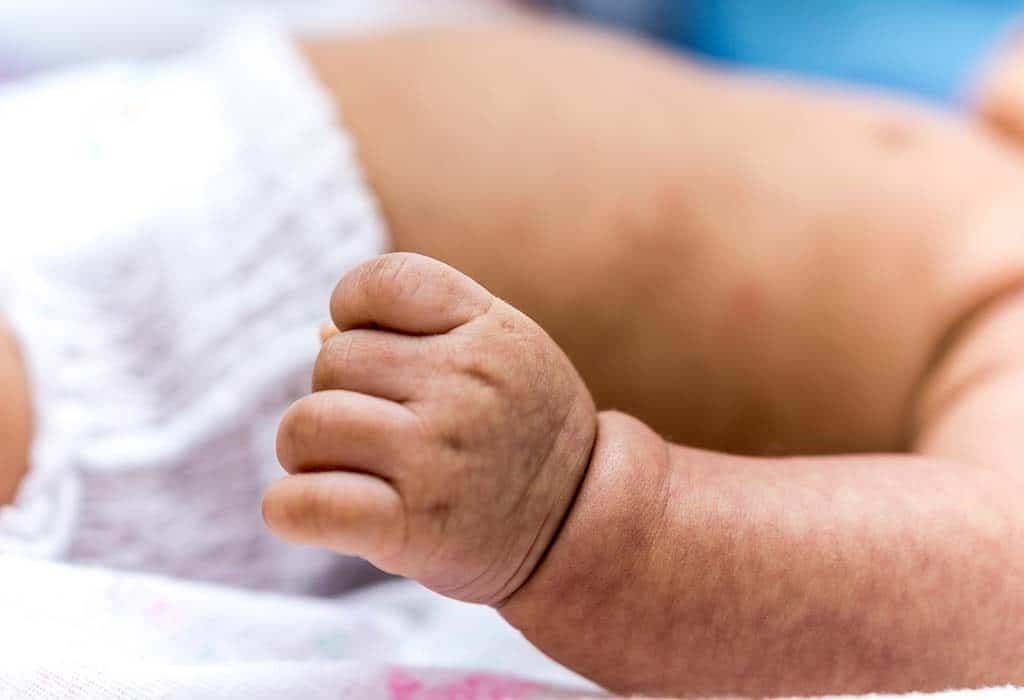
Newborns often show redness and blotchy skin from birth trauma or sensitive circulation, which can dominate a photo if left unchecked. Yellowish skin tones frequently stem from indoor lighting or mild jaundice, casting an unhealthy glow that needs balancing. Purple or blue hands and feet arise from immature blood flow, especially in cooler rooms, adding unwanted cool casts.
Addressing these early prevents bigger edits later.
1. Core Color and Tone Adjustments for Light and Airy Newborn Photo Editing
Adjusting White Balance for Warm, Accurate Skin Colors
Warm tones in newborn photos create a cozy, inviting feel that mimics natural sunlight, making skin appear healthy and vibrant. Fix blue, green, or yellow casts by selecting a neutral gray point in your editing software, then tweak temperature sliders toward warmer values—often increasing the temperature slightly for that gentle glow. Accurate white balance proves crucial here, as it grounds the entire image in realism, avoiding artificial looks that erode trust.
Lowering Contrast to Avoid Harsh Shadows on Baby Skin
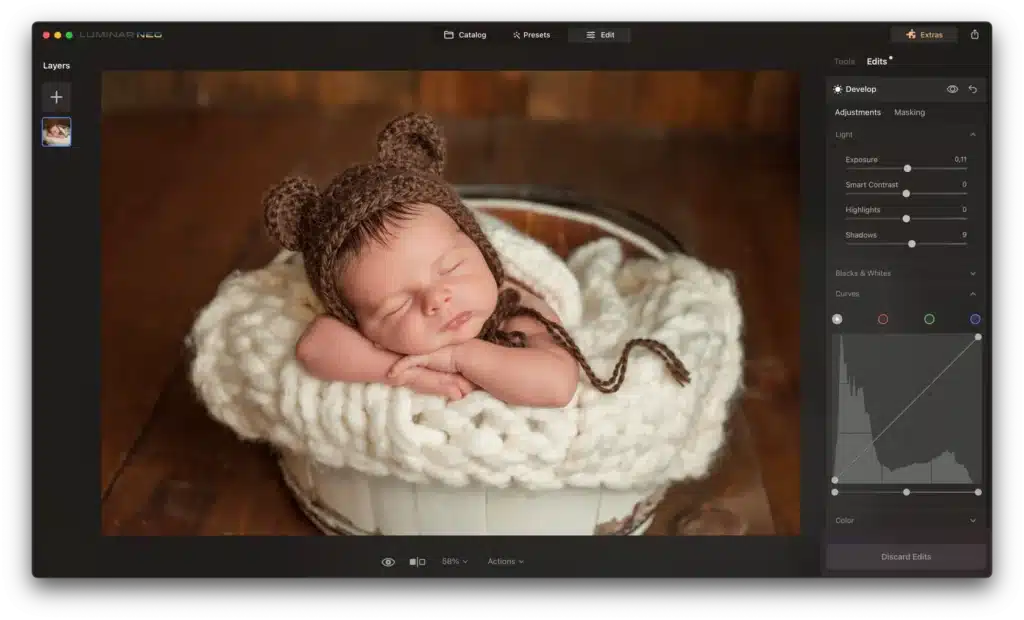
High contrast amplifies strong shadows, which can make delicate baby skin look textured or aged prematurely. A soft tonal range smooths these out, enhancing the ethereal quality of newborn portraits. Control contrast gently by pulling back the slider in tools like Lightroom (try -20 to -40 as a starting point), watching for even transitions that preserve detail without drama.
Reducing Clarity to Create a Soft, Creamy Skin Look
Clarity boosts mid-tone details, but too much sharpens imperfections like tiny pores or flakes. Lower it to smooth harsh elements, achieving that creamy texture without flattening the image—experts often recommend -10 to -20 for newborns to diffuse lines while keeping a natural feel. Issues arise when clarity stays high, turning soft skin into something unnaturally crisp—dial it back for balance.
Using the Tone Curve for Bright and Gentle Exposure
Tone Curve Edit for Soft Glow in Newborn Photo Editing
A light S-curve on the tone curve lifts shadows and adds a soft glow, perfect for airy styles. Lift mid-tones carefully to brighten without clipping highlights, supporting clean, ethereal newborn vibes.
This technique keeps exposures balanced and inviting.
2. Targeted Color Correction for Newborn Skin Imperfections
Correcting Redness Using Selective Color Adjustments
Target blotchy areas or birthmarks with selective tools like the HSL panel in Lightroom, decreasing saturation or luminance in reds and oranges while preserving surrounding hues. This evens skin naturally, avoiding a washed-out effect. Use brushes for precision on specific spots.
Before and after examples show how correction tames red blotchiness.
Fixing Purple or Blue Hands and Feet Gently
This discoloration happens due to developing circulation in newborns, often worsened by cold environments. Lighten tones subtly with hue adjustments or curves layers, shifting magentas and cyans toward warmer values, matching to nearby skin without altering texture.
Neutralizing Yellow Skin Tones for Healthy Color Balance
Yellow tints often come from tungsten lights or jaundice; gentle shifts in the HSL panel—reducing yellow saturation or adding opposing blues—restore realism. This boosts overall healthiness in the photo.
3. Blemish Removal While Preserving Natural Baby Features
Removing Temporary Marks Without Over-Editing
Handle flakes, scratches, or pimples with healing brushes or spot removal tools, but keep edits light to avoid unnatural perfection. Subtle fixes enhance without erasing the baby’s real charm—use low opacity for seamless blending.
Protecting Eyes, Lips, and Fine Details
Leave eyes, lips, and hair untouched to maintain authenticity—these areas define the softness and realism.
4. Retouching for a Smooth and Natural Finish
Applying Gentle Skin Smoothing Without a Plastic Look
Over-smoothing strips the texture, creating a fake plastic sheen that hurts credibility. Soften tones while retaining subtle details using low-opacity Gaussian blur or frequency separation; stop when skin feels lifelike yet polished—avoid going beyond what’s needed for creamy newborn skin.
Enhancing Cheeks and Lips for a Healthy Glow
Add soft pink tones via selective color layers or low-opacity brushes, steering clear of bold or fake hues for a natural flush that mimics a healthy glow.
5. Final Touches That Complete Professional Newborn Photo Editing
Using Soft Vignettes to Draw Attention to the Baby
Subtle vignettes guide eyes to the baby, keeping edges light and natural for focus without distraction—apply gently in Lightroom’s radial filter.
Fine-Tuning Brightness for a Balanced Final Look
Avoid harsh highlights by softening them; keep shadows gentle for an overall harmonious feel, lifting them slightly if needed.
How Lighting Choices Reduce Heavy Color Correction
Simple Natural Light Setup for Newborn Shoots
Natural light softens skin tones upfront, cutting down on post-processing time. Better lighting minimizes casts, saving hours in edits. Set up near large windows with diffusers for even illumination—position the baby at 45 degrees to the source for flattering shadows.
A simple natural light setup can transform your newborn shoots.
Editing Workflow Tips for Consistent Newborn Galleries
Apply the same preset across images for uniform tones, ensuring galleries flow seamlessly. Consistency builds client expectations and loyalty. Develop habits like batch editing exposures first, then colors, to streamline sessions.
Frequently Asked Questions
How do I fix orange skin tones in newborn photos?
Start by correcting exposure, then adjust white balance to cooler tones. Retouch selectively before final grading.
What’s the best way to edit red baby skin?
Use frequency separation in Photoshop or HSL adjustments in Lightroom to target reds without affecting texture.
Why do newborn hands and feet turn purple in photos?
It’s from immature circulation; warm the room and correct with hue shifts in editing.
How can I achieve creamy skin tones in Lightroom?
Decrease clarity to -10 to -20, boost fill light, lower contrast, and adjust curves for softness.
Is over-retouching a common mistake in newborn editing?
Yes, it leads to unnatural looks; focus on subtle enhancements.
Conclusion and Soft Tone Editing Checklist
Newborn photo color correction unlocks the full potential of your images, delivering soft, smooth tones that capture heartfelt moments. From balancing whites to gentle retouching, these steps ensure natural, trustworthy results.
Here’s a quick checklist to reuse:
- Check white balance for warmth
- Lower contrast for soft shadows
- Reduce clarity for creamy skin (-10 to -20)
- Apply selective color fixes via HSL
- Use a light S-curve on the tone curve
- Add subtle vignettes
- Fine-tune brightness