

Have you ever wondered why some online shoe stores look incredibly professional while others seem amateur? The secret often lies in one crucial technique: clipping paths. Whether you’re running a Shopify boutique or listing products on Amazon, learning the clipping path technique can transform your product photos from average to exceptional.
This comprehensive tutorial guides you step by step through creating precise clipping paths for shoe images, helping you achieve a clean, professional look in shoe image editing that drives conversions, improves product presentation, and builds lasting customer trust.
Introduction to Shoe Clipping Paths
What is a clipping path in product photo editing
A clipping path is a vector-based outline created in image editing software to isolate a specific object from its background. Think of it as drawing a digital boundary around your shoe that tells the software, “Keep everything inside this line, remove everything outside.” Unlike pixel-based selections that can appear rough or jagged, clipping paths use mathematical curves called Bézier curves, ensuring smooth, scalable edges that maintain quality at any size.
Why do shoe images need precise background removal?
Shoes present unique challenges in product photography. The curved surfaces, intricate lace patterns, textured materials, and dimensional soles create complex edges that demand precision and attention to detail. A poorly executed background removal can make leather look fuzzy, mesh materials appear solid, or create unnatural halos around the product. Professional retailers understand that clean product images have a direct impact on purchase decisions. Studies consistently show that high-quality images increase conversion rates by 30-40%, making precise background removal a critical investment rather than an optional enhancement.
Importance for e-commerce platforms
Major marketplaces like Amazon, eBay, and Shopify have strict image requirements. Amazon mandates pure white backgrounds (RGB 255, 255, 255) for main product images, with the product occupying at least 85% of the frame. eBay recommends similar standards for optimal visibility in search results. These platforms understand that consistent, professional imagery builds buyer confidence. When customers can clearly see product details without distracting backgrounds, they make faster purchase decisions and return products less frequently.
Manual clipping path vs AI background removal
Artificial intelligence tools have advanced significantly, offering one-click background removal that works reasonably well for simple products. However, shoes remain challenging for automated systems. AI often struggles with thin laces, transparent materials, intricate stitching, and the subtle depth variations in soles and heels. While AI tools excel at speed and can handle bulk processing for simpler items, manual clipping paths still deliver superior accuracy for footwear. The best approach combines both: use AI for initial rough cuts, then refine with manual paths for production-ready results.
What Is a Clipping Path for Shoe Images?
Definition of the clipping path technique
A clipping path specifically for shoes involves creating a closed vector path that follows the exact contours of the footwear. This path functions as a mask, determining which pixels remain visible and which become transparent or replaced with a different background. The path itself doesn’t alter the original image data—it simply defines boundaries, making it non-destructive and reversible. This flexibility allows you to reuse the same path for multiple purposes: transparent backgrounds for web use, white backgrounds for Amazon, or even colored backgrounds for marketing materials.
Why are shoes challenging to clip
Footwear combines multiple difficult elements in one product. Athletic shoes feature mesh panels with visible texture, dress shoes have reflective leather surfaces, and boots include complex lacing systems with dozens of eyelets. The rubber sole creates shadow areas and depth variations that need careful handling. Strappy sandals present the ultimate challenge with negative spaces between straps that must be cut out individually. Each material type reflects light differently, creating varying edge definitions that require different anchor point strategies.
Common use cases: catalogs, ads, marketplaces
Product catalogs require consistent white or neutral backgrounds across hundreds of shoe models, demanding repeatable clipping path workflows. Digital advertisements often need transparent backgrounds to overlay shoes onto lifestyle scenes or colored gradients. Marketplace listings benefit from multiple angles of the same shoe, all requiring identical background treatment for visual coherence. Print catalogs need high-resolution paths that scale without quality loss. Fashion lookbooks might require shoes composited onto different surfaces or environments, making saved paths invaluable for quick iterations.
Tools and Requirements
Recommended software (Adobe Photoshop)
Adobe Photoshop remains the industry standard for professional clipping paths. The Pen Tool in Photoshop offers unmatched precision and control, with features specifically designed for commercial image editing. While alternatives like GIMP, Affinity Photo, or online editors exist, Photoshop’s path management system, extensive shortcuts, and industry-wide file compatibility make it the professional choice. Version CC 2025 includes improved path smoothing and AI-assisted anchor point suggestions, though the core technique remains consistent across versions dating back years.
Pen Tool overview
The Pen Tool creates paths by placing anchor points connected by curved or straight line segments. Two types of anchor points exist: corner points that create sharp angles, and smooth points that create flowing curves. By clicking and dragging when placing points, you create direction handles that control curve shape and angle. This combination allows you to trace any shape accurately. The tool requires practice—expect your first few attempts to feel awkward—but muscle memory develops quickly with consistent use.
Image requirements (resolution, lighting, background)
Start with the highest resolution available, ideally 3000 pixels on the longest side for e-commerce use. Higher resolution provides more edge detail, making accurate tracing easier. Good lighting creates clear edge definition—avoid harsh shadows that obscure the shoe’s outline or create false edges. A contrasting background simplifies the process: photograph white shoes on dark backgrounds and vice versa. Avoid busy patterns or similar tones that make distinguishing the shoe edge difficult. If working with existing product photos, accept what you have, but note lighting issues for future shoots.
Step-by-Step Clipping Path Tutorial for Shoe Images
- Set Up Your Pen Tool.
- Draw a Path Around Your Shoe.
- Save Your Path.
- Create a Traditional Clipping Path.
- Create a Selection and Remove Background.
- Apply a Layer Mask.
Step 1: Set Up Your Pen Tool
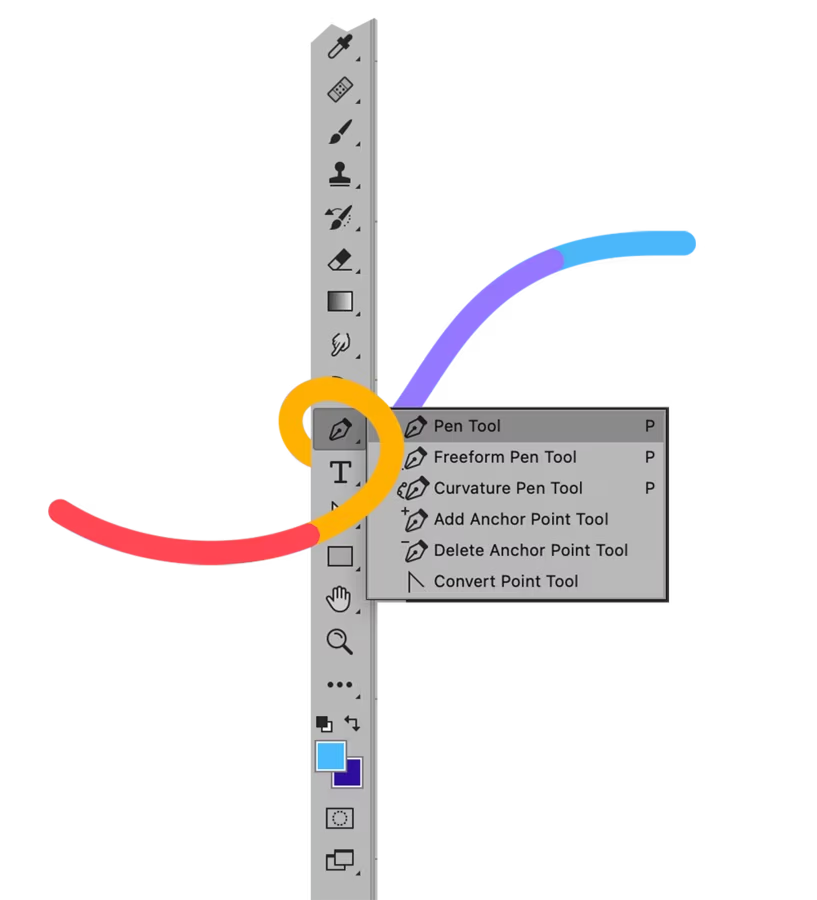
Open your shoe image in Photoshop and select the Pen Tool from the toolbar (or press “P” on your keyboard). If you don’t see the Pen Tool, it might be hidden behind the Freeform Pen Tool or Curvature Pen Tool—click and hold to reveal all options.
In the Options Bar at the top of your screen, select “Path” mode and choose “Combine Shapes.” This setting is critical—using “Shape” mode instead creates filled vector graphics rather than the clipping path you need. Double-check this setting before proceeding.
Pro tip: Open your Paths panel (Window > Paths) now so it’s ready when you need to save your path. Having both the Layers and Paths panels visible streamlines your workflow.
Step 2: Draw a Path Around Your Shoe
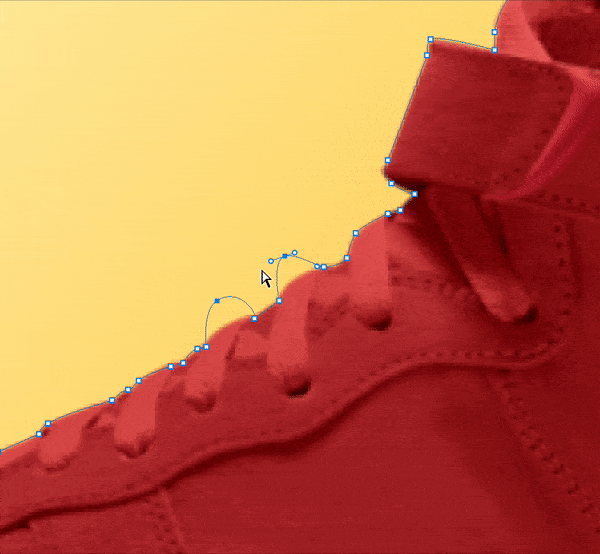
Click once along the shoe’s edge to place your first anchor point. For the second point, click but don’t release—drag your mouse along the curve to create a curved path segment. The direction handles that appear control the curve’s shape. Release when satisfied.
Continue clicking and dragging around the entire shoe edge. Use these techniques:
- Straight edges: Single click without dragging
- Smooth curves (toe box, heel): Click and drag following the curve direction
- Sharp corners (sole edges): Single click to create corner points
Work your way completely around the shoe until you return to your starting point. When you hover over the first anchor point, a small circle appears next to your cursor—click to close the path.
For complex areas: Thin laces and straps need careful point placement. Textured soles can be simplified—follow the overall shape rather than every groove. Use the Direct Selection Tool (A) to adjust any anchor points that aren’t quite right.
Step 3: Save Your Path
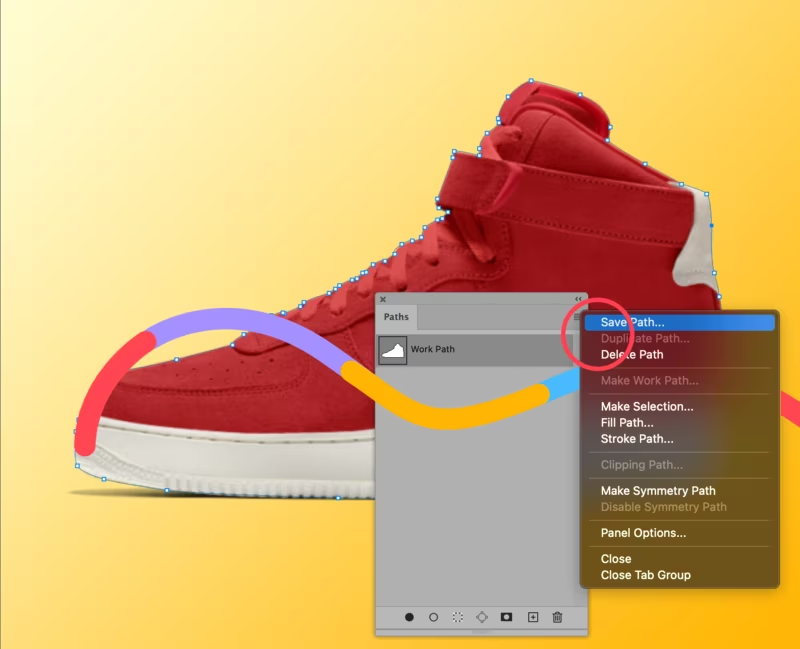
Once your path is complete, go to the Paths panel. You’ll see “Work Path” listed—this is temporary and will be replaced if you create another path. Click on the Work Path, then click the panel menu (three lines icon) and choose “Save Path.”
Name your path descriptively: “Shoe Outline,” “Red Sneaker Path,” or include the product SKU. Clear naming matters when handling multiple products or returning to files later. For shoes requiring multiple paths (sandals with cutouts, designs with laces), use names like “Main Shoe,” “Laces,” “Logo Area.”
Step 4: Create a Traditional Clipping Path
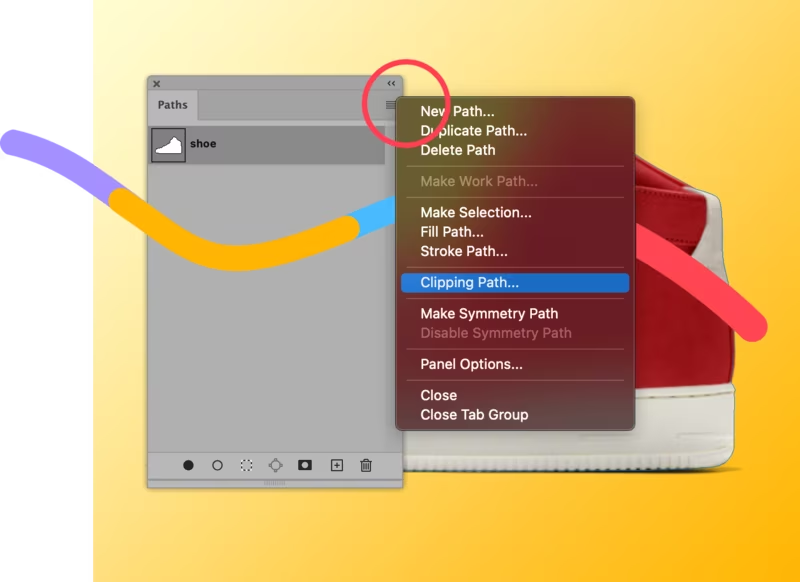
If you’re placing your shoe image into InDesign, Illustrator, or other design software, create a traditional clipping path. Select your saved path in the Paths panel, click the panel menu, and choose “Clipping Path.”
You won’t see visual changes in Photoshop, but when you save as PSD and place the file into design applications, the background automatically clips away. This workflow is standard for catalog production and print design, where images need to integrate with layouts.
Step 5: Create a Selection and Remove Background
For direct background removal in Photoshop, ensure your image layer is unlocked. If you see a padlock icon on your Background layer, double-click it to convert it to “Layer 0.” Click OK.
In the Paths panel, select your saved path. From the panel menu, choose “Make Selection.” In the dialog box, set Feather Radius to 0 pixels and ensure Anti-aliased is checked. Click OK—you’ll see marching ants around your shoe.
Now comes the crucial step: Go to Select > Modify > Contract. Set the contract amount to 1 pixel and click OK. This moves your selection slightly inward, preventing background color artifacts from showing around your shoe edges. This single pixel makes the difference between amateur and professional results.
Step 6: Apply a Layer Mask
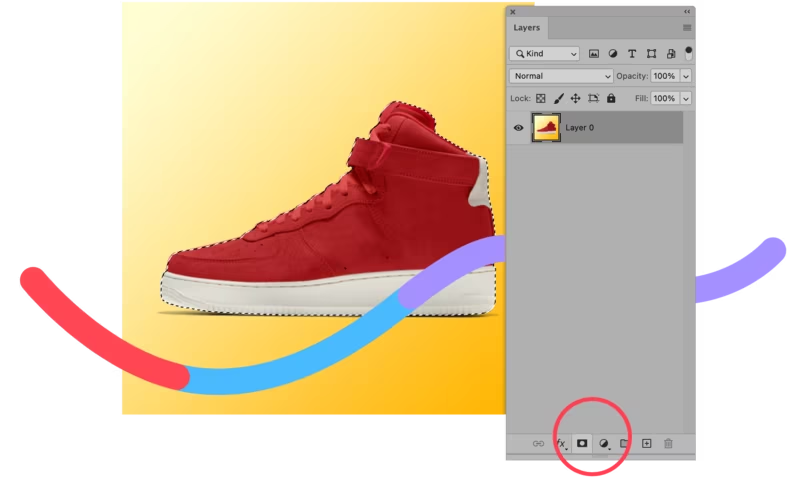
With your contracted selection active and Layer 0 selected in the Layers panel, click the “Add Layer Mask” icon at the bottom of the panel (it looks like a rectangle with a circle cut out).
Your shoe is now isolated on a transparent background using a non-destructive layer mask. The original background still exists beneath the mask, allowing future adjustments without re-creating the path. You can:
- Add new backgrounds by creating layers beneath Layer 0
- Refine the mask by painting with black (hide) or white (reveal)
- Disable the mask temporarily by Shift-clicking it
- Export with transparency for web use or add a white layer for marketplace requirements
Export options: Save your working file as PSD to preserve all layers and paths. Export as PNG for web use with transparency, or flatten with a white background layer and save as JPEG for Amazon, eBay, or other marketplace requirements.
Advanced Shoe Clipping Path Techniques
Multi-path clipping for laces, soles, and details
Complex footwear designs often require multiple separate paths rather than one continuous outline. Strappy sandals with negative spaces between straps need individual paths for each strap. Athletic shoes with mesh cutouts benefit from separate paths defining each opening. High-top sneakers with multiple lacing zones might need three or four distinct paths.
Create each path separately, save it with a descriptive name, then combine them using the Paths panel options. Select multiple paths while holding Ctrl (Cmd), then use the “Combine Shapes” option to merge them into one complex path. Alternatively, convert each path to a selection, combine selections using Add to Selection mode, then save the combined selection as a new path. This workflow requires planning but produces cleaner results than trying to jump between disconnected areas with a single path.
Editing complex shoe designs
Shoes with embellishments, cutouts, or mixed materials need specialized approaches. Perforated leather requires decisions about whether to cut out each tiny hole or simplify the area. At typical web viewing sizes, individual perforations often aren’t visible, making simplified paths acceptable. For hero images or zoom-enabled product pages, accurate hole-by-hole paths matter more.
Metallic hardware like eyelets, buckles, or logo plates sometimes needs separate treatment to preserve their distinct edges and reflectivity. Create paths for these elements individually, then use layer effects or retouching to enhance their appearance after background removal. Transparent materials like mesh or plastic windows require careful edge work—trace the material’s edge, not what shows through it.
Preparing images for color or texture changes
Saved clipping paths enable rapid color variations without re-editing. Fashion brands selling shoes in multiple colors photograph one sample, then use paths to isolate the shoe and apply color adjustments. Select the path, convert to selection, then use Hue/Saturation adjustments or Color Replacement tools to generate color variants. This workflow reduces photography costs dramatically.
Texture changes work similarly. A canvas sneaker can become leather-textured digitally by isolating the upper material with a sub-path, then applying texture overlays. While this approach doesn’t replace proper photography for primary product images, it works well for showing additional options or creating marketing variations quickly.
Common Mistakes to Avoid
Over-feathering edges
Beginning editors often apply excessive feathering (3-5 pixels or more), thinking it creates smoother transitions. In reality, high feathering makes products look unfocused and unprofessional. Shoes should have crisp, defined edges since they’re solid objects. Keep feathering between 0.5-1 pixel for most footwear. Test your edges at 100% zoom—if they look blurry, reduce feathering. The only exception is fuzzy materials like sheepskin or suede, where slightly more feathering matches the material’s natural softness.
Jagged or uneven paths
Paths with too many anchor points create bumpy, unnatural outlines that look hand-cut rather than photographed. This happens when editors place points too closely together or fail to use curves effectively. Practice smooth, flowing paths with fewer points. One anchor point every 20-30 pixels works for most curves. Straight edges might need only 2-3 points total. Review your paths at different zoom levels—what looks smooth at 400% might appear jagged at 100%.
Relying fully on automated tools
AI background removal tools improve constantly, but still fail on complex footwear. Transparent mesh, thin laces, or dark shoes on dark backgrounds confuse algorithms, producing messy results. Use AI for speed on simple products, but always manually inspect and refine shoe images. The five minutes spent perfecting paths prevent customer complaints and returns caused by misleading imagery. Professional studios use AI for rough cuts, then employ skilled editors for final refinement—combining efficiency with quality.
Manual Clipping Path vs AI Tools
Accuracy and edge control
Manual clipping paths offer pixel-perfect accuracy around every curve, hole, and detail. You control exactly where the path runs, accounting for material textures, lighting conditions, and artistic intent. AI tools use machine learning to guess where edges exist, occasionally misidentifying reflections, shadows, or texture variations as edges. For high-stakes commercial photography where image quality directly impacts revenue, manual paths remain superior.
That said, AI accuracy improves monthly. Current tools handle simple sneakers on plain backgrounds remarkably well. The gap narrows for straightforward products while remaining significant for complex designs. Test AI tools on your specific product types—you might find acceptable quality for certain categories while needing manual work for others.
Cost and scalability
AI tools process hundreds of images in minutes at minimal cost—many services charge pennies per image. Manual clipping paths require skilled labor at $1-5 per image, depending on complexity. For businesses processing thousands of product images, this cost difference significantly impacts budgets. However, factor in revision costs—poor AI results requiring manual fixes can exceed the cost of doing it right initially.
Consider hybrid workflows: use AI for bulk processing of simpler items, reserve manual paths for hero images, complex products, and anything customer-facing on main product pages. This balanced approach optimizes both cost and quality, scaling efficiently while maintaining brand standards where they matter most.
When manual clipping is still essential
Certain situations demand manual work. Luxury products require perfection that justifies premium prices—automated imperfections undermine brand positioning. Complex designs with intricate details, mixed materials, or negative spaces exceed current AI capabilities. Images destined for print, large format, or zoom functionality need precision that withstands close examination. Legal or regulated products (medical shoes, safety footwear) might require documentation-quality imagery that automated tools can’t guarantee.
Additionally, if you’re building a reusable path library for color variants or multi-purpose use, invest in manual paths once rather than repeatedly reprocessing with AI. The upfront time investment pays dividends across multiple applications of the same product image.
Final Tips for Perfect Shoe Clipping Paths
Workflow optimization tips
Develop a consistent sequence and stick to it. Professionals often follow this pattern: import and organize files, rough AI removal, manual path refinement, shadow creation, export in multiple formats, and quality check. This assembly-line approach builds muscle memory and reduces errors from skipped steps. Use Photoshop Actions to automate repetitive tasks like creating white background layers or applying standard feathering settings.
Organize files systematically from the start. Use clear naming conventions that include product codes, angles, and processing status. Create template folder structures for each project: Raw Images, Working Files, Final Outputs, Path Libraries. This organization prevents time waste searching for files or accidentally overwriting finished work with earlier versions. Five minutes of setup saves hours of frustration.
Quality checklist before upload
Before finalizing any image, run through these verification points: Check edges at 200% zoom for leftover background pixels or missing product areas. Verify the background is truly pure white (RGB 255, 255, 255) using the eyedropper tool. Confirm file format matches platform requirements. Check that resolution meets minimums (typically 1500px for e-commerce). Ensure shadows look natural without harsh edges or incorrect directions. Review overall composition—proper alignment, adequate padding, consistent sizing relative to other catalog images.
Test your images in context. Upload to a staging site or mockup tool to see how they appear alongside other products and on various devices. Colors and contrast might look different in situ versus your editing monitor. Getting stakeholder approval on a few samples before processing entire batches prevents costly re-work.
Long-term benefits for brand trust and conversions
Investing in professional image quality delivers compounding returns. Clean, consistent product imagery establishes your brand as legitimate and trustworthy. Customers unconsciously associate visual quality with product quality—even if your shoes are exceptional, poor images undermine perceived value. Studies show that 93% of consumers consider visual appearance the key deciding factor in purchase decisions, outweighing descriptions and reviews.
Long-term, quality imagery reduces returns caused by unmet expectations. When customers see exactly what they’re buying, they make informed decisions and remain satisfied post-purchase. This reduces the costly reverse logistics of returns and exchanges while building positive reviews and repeat business. The upfront investment in clipping path quality pays dividends in customer lifetime value, making it one of the highest-ROI activities in e-commerce operations.
FAQs About Clipping path tutorial for shoe images
What is the best software for creating clipping paths on shoe images?
Adobe Photoshop is the industry standard for professional clipping paths. Its Pen Tool offers precise control, saved paths remain editable, and the file format compatibility ensures your work integrates with any workflow. Alternatives like GIMP provide similar tools for free, while Affinity Photo offers a budget-friendly paid option. However, if working professionally or outsourcing to services, Photoshop’s PSD format is universally expected and supported.
How long does it take to create a clipping path for one shoe image?
Simple shoes with smooth curves take experienced editors 5-10 minutes. Complex designs with intricate lacing, cutouts, or embellishments can require 15-30 minutes. Beginners should expect 20-40 minutes while building proficiency. Speed improves dramatically with practice as muscle memory develops. Using shortcuts and optimized workflows cuts time substantially compared to menu-based work.
Can I use AI tools instead of manual clipping paths for shoes?
AI tools work adequately for simple athletic shoes or boots on contrasting backgrounds, offering significant time savings. However, they struggle with thin straps, laces, transparent materials, and low-contrast edges. For commercial e-commerce use, AI provides a good starting point requiring manual refinement rather than a finished solution. High-end product photography still demands manual precision for professional results.
What file format should I use when exporting clipped shoe images?
Save working files as PSD to preserve layers and paths for future editing. Export to PNG-24 for web use requiring transparency. Use JPEG with white background layers for marketplaces like Amazon that prohibit transparent backgrounds. TIFF format works best for print applications or archival purposes. Always maintain PSD masters—never overwrite them with flattened exports.
Why do my clipped shoe images have white halos around the edges?
White halos result from paths running too far outside the actual shoe edge, capturing background pixels. To fix this, edit your path to run approximately 0.5 pixels inside the visible edge, accounting for antialiasing. Alternatively, use the Defringe or Remove White Matte commands in Photoshop. Preventing halos during initial path creation saves significant correction time later.
How can I ensure consistency across multiple shoe product images?
Create standard operating procedures for your photography and editing. Use fixed camera positions, consistent lighting, and template guides for product placement. In Photoshop, develop Actions that apply standard feathering, sizing, and formatting automatically. Build style guides showing acceptable examples, and use overlay templates to verify positioning across all images. Consistency comes from documented, repeatable processes rather than individual judgment calls.
Wrapping Up
Learning the clipping path technique transforms your footwear product photography from amateur snapshots to professional, catalog-quality images. While AI tools continue improving, manual clipping paths remain essential for achieving the precision, control, and quality that complex shoe designs demand. By following this tutorial’s step-by-step guidance, you’ve gained the foundational skills to create clean, professional product images that meet strict e-commerce platform standards.
Remember that mastery comes through practice. Your first few clipping paths will feel slow and imperfect, but each image develops your accuracy and speed. Implement the quality checklist, avoid common mistakes, and consider outsourcing bulk work when economics favor it. The investment in professional image quality directly impacts customer perception, conversion rates, and long-term brand equity.