

Imagine snapping a photo of your favorite outfit, only to find it looks flat and uninspiring. You know the clothes are fabulous, but the image doesn’t do them justice. Enter the world of the Clothes Photo Editor, a game-changer that transforms your photos into vibrant, professional-quality visuals with just a few clicks. Whether you’re a fashion blogger, an e-commerce seller, or someone who loves sharing stylish looks on social media, these editors make your outfits pop with stunning filters and intuitive tools.
In this guide, we’ll dive deep into how a Clothes Photo Editor can elevate your images, share personal insights from my experiments, and explore why this tool is a must-have for anyone aiming to create eye-catching fashion visuals in 2025.
Why use Clothes photo editor?
By using Clothes photo editor, it is possible to present your clothes photos more attractively. Here are some of the benefits of clothing photo editing and why it’s so easy to use.
Benefits of Editing Clothes Photos:
- Making the dress attractive: With a Clothes photo editor, you can present your clothes photo more brightly and attractively. It makes clothes more stylish and eye-catching using various filters and effects, which is very useful for social media or online shopping.
- Benefits of Background Changer: Clear and appropriate backgrounds are essential for product photography. Background can be changed with the Clothes photo editor, which gives a professional and clean look.
- Social Media and Marketing: Useful: By presenting the image more beautifully on the online platform, it attracts the viewers. Editing clothing photos with the editor is ideal for social media and e-commerce sites.
Add Your Heading Text Here
- Simple interface: The interface of the Clothes photo editor is very simple, which is convenient to use even for beginners. It has all the necessary tools at hand and allows for quick editing.
- Quick Editing Features: The editor is able to work quickly, which saves time and simplifies the process of image editing.
- Suitable for all: This editor is usable by professionals as well as new users. Anyone can edit photos with simple instructions and options.
Clothes photo editor is easy to use and edit clothes photos for a professional look. It is easy to use for beginners and an ideal tool for image editing.
How to Use a Clothes Photo Editor: Step-by-Step Guide
Ready to create stunning outfit photos? Here’s a practical guide to using a Clothes Photo Editor, based on my workflow:
Select Your Photo
Choose a high-resolution image from your phone or camera. For best results, shoot in natural light or use a softbox for even lighting. I found that photos taken during the golden hour (early morning or late afternoon) need less editing for vibrancy.
Open the Editor
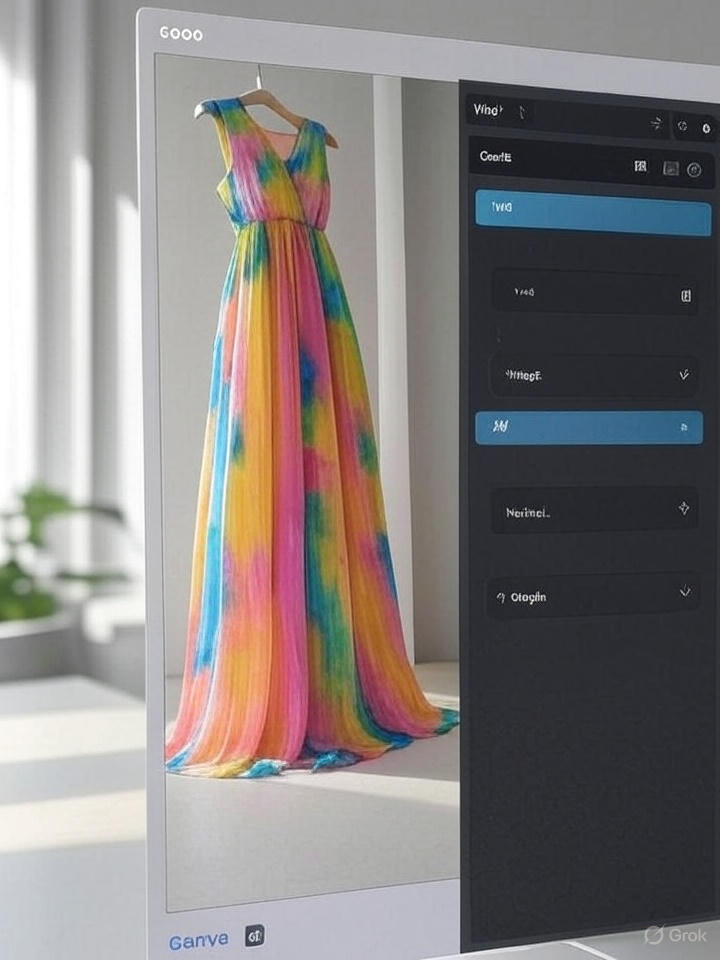
Launch your chosen app (e.g., Canva or PhotoDirector). Most editors have a clear “Edit Photo” button on the main menu. Upload your image or take a new one directly in the app.
Adjust Color and Lighting
Start with brightness and contrast to make the outfit stand out. Increase saturation slightly to enhance fabric colors, but keep skin tones natural. For example, in Adobe Express, I use the “Adjust” tab to fine-tune exposure and highlights.
Apply a Filter
Choose a filter that matches your aesthetic. For a clean, e-commerce look, try a neutral filter. For social media, a vibrant or vintage filter adds personality. Test a few options to see what works—VSCO’s A6 filter gave my dress photo a soft, editorial vibe.
Remove or Change the Background
Use the background removal tool to isolate the outfit. Replace it with a clean white background for product photos or a lifestyle setting for social media. Remove.bg’s AI made this step effortless in my tests, even with intricate patterns.
Enhance Textures and Details
Use sharpening or clarity tools to highlight fabric details. In Luminar Neo, I applied the “Details Enhancer” to emphasize a leather jacket’s texture, making it look premium.
Add Final Touches
Experiment with shading, highlights, or AI effects like virtual accessories. For instance, Fotor’s “Glow” effect added a subtle sheen to a silk blouse, elevating its appeal.
Save and Share
Export the image in high resolution (JPEG or PNG for web use). Share directly to social media or upload to your e-commerce platform. Always save a copy in RAW format for future edits.
Best Practices for Editing Best Clothes Photo Editing
- Use Soft Filters
- Adjust Clarity and Sharpness
- Pay attention to the background and Lighting
- Test Different Filters and Effects
By following these steps and adhering to best practices, anyone can easily create high-quality clothing photos with a photo editor.
Professional effects with photo clothes editor
There are some special techniques to follow to add a professional effect to clothing photos. First, adjust the brightness and contrast properly. Next, you can increase the saturation to clarify the color of the clothing. Use selective filters and blur effects to give photos a more professional look.
Tips for Achieving Professional Looks
- Layering Techniques: Use different layers to add depth to the image.
- Clean Backgrounds: Bring the outfit into focus by using clean backgrounds.
- Realistic Shadows: Add shades and shadows to make the image look realistic.
Popular Editing Styles for Clothes
Natural Look: Keep natural colors and use soft filters. Vintage Style: Use soft tones and grain effects to bring a classic look to clothing photos.
Tips for choosing the best Clothes photo editor
Key Factors for Selection
- The interface should be simple so that even beginners can use it easily.
- Variety of editing tools—such as filters, background changes, and shading options.
Why Clothes Photo Editing is Essential
Editing is needed to improve the quality of clothing photos and make them suitable for social media, e-commerce, and promotions.
Benefits for Personal and Professional Use
- Professional Presentation: Enhances the image’s clarity and interest for advertising and e-commerce.
- Personal Branding: Helps to present yourself well on social media.
Clothes photo editor is a very effective tool for editing clothes photos. It’s very simple and user-friendly, so anyone can use it easily. Using a photo editor is very important for good photo editing. With proper editing and some small tricks, you can give outfit photos a more beautiful and professional look.
Comparing Top Clothes Photo Editors
To help you choose the right tool, here’s a comparison of five popular Clothes Photo Editors based on features, ease of use, and pricing (as of July 2025):
|
Editor |
Key Features |
Ease of Use |
Pricing |
Best For |
|
Adobe Express |
Color grading, background removal, templates |
Beginner-friendly |
Free; Premium $9.99/mo |
Bloggers, small businesses |
|
PhotoDirector |
AI background removal, filters, skin smoothing |
Very intuitive |
Free; Premium $3.99/mo |
Social media influencers |
|
Canva |
Drag-and-drop, filters, templates |
Extremely easy |
Free; Pro $14.99/mo |
E-commerce, casual users |
|
Fotor |
AI retouching, background swap, effects |
Moderate |
Free; Pro $8.99/mo |
Fashion portfolios, professionals |
|
Luminar Neo |
Texture enhancement, AI sky replacement |
Moderate |
$11.95/mo or $149 one-time |
Advanced users, photographers |
FAQs About Clothes Photo Editors
What is the best Clothes Photo Editor for beginners?
Canva and PhotoDirector are ideal for beginners due to their simple interfaces and one-tap tools. Canva’s drag-and-drop features make it perfect for quick edits, while PhotoDirector’s AI tools handle complex tasks like background removal.
Can I use a Clothes Photo Editor for e-commerce?
Absolutely! Editors like Fotor and Adobe Express offer background removal and color correction, creating clean, professional images that meet e-commerce standards like Amazon or Etsy.
Are free Clothes Photo Editors effective?
Yes, free versions of Canva, Fotor, and PhotoDirector offer robust tools for basic edits. For advanced features like AI retouching or RAW editing, consider premium plans.
How do I make my outfit photos look professional?
Focus on lighting, use background removal for a clean look, and apply subtle filters to enhance colors. Tools like Luminar Neo can add texture and depth for a polished result.
Can AI-powered editors replace professional software?
AI tools like Photoleap are powerful for quick edits, but professional software like Adobe Photoshop offers more control for complex projects. For most users, AI editors are sufficient.
Conclusion
A Clothes Photo Editor is your ticket to creating stunning, vibrant fashion photos that captivate your audience. Whether you’re enhancing a dress’s texture, swapping backgrounds, or applying a bold filter, these tools make it easy to achieve professional results without a steep learning curve. My experiments with Canva, Fotor, and Luminar Neo showed me how quickly you can transform a simple photo into a share-worthy masterpiece. In 2025, where visuals reign supreme, these editors are essential for standing out on social media, boosting e-commerce sales, or building a fashion portfolio.