Have you ever thought? You’re scrolling through real estate listings and spotting a drone photo where the property boundaries are crystal clear, helping you instantly grasp the lot size and layout. That’s the power of adding property lines in Photoshop—it transforms standard images into informative visuals that attract serious buyers. Have you ever thought why it is so important to know how to add property listing lines?
In today’s competitive market, where visuals drive decisions, this technique elevates listings by providing transparency and context. Whether you’re highlighting a sprawling suburban yard or a compact urban plot, overlaying accurate boundaries builds trust and reduces questions from potential clients.
This guide explores how to add property lines in Photoshop, specifically designed for real estate professionals seeking to enhance their photo editing workflow.
We’ll cover everything from preparation to advanced tweaks, ensuring your images stand out on MLS platforms or social media.
Drawing from over a decade of experience in real Estate Photo Editing, plus insights from industry pros. Let’s get started on making your real estate image editing more effective.
Why Adding Property Lines in Photoshop Improves Real Estate Listings
The importance of showing real estate property boundary lines clearly in listing photos
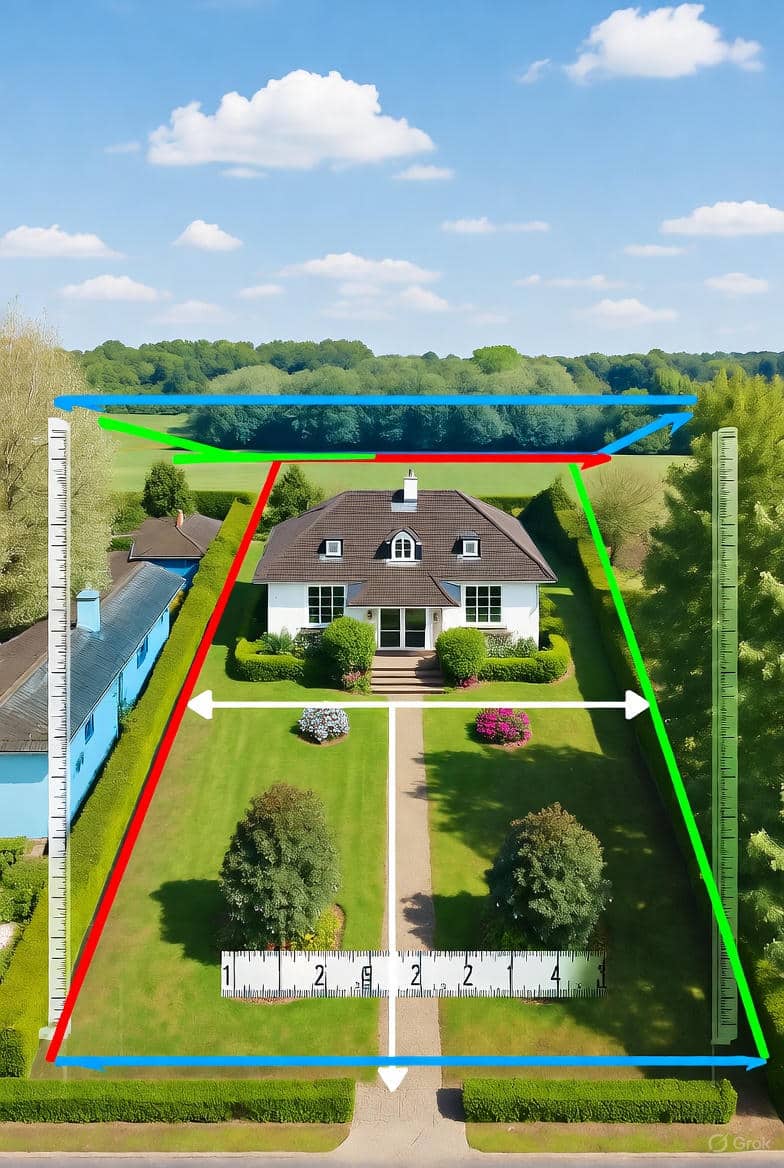
Clear property boundaries in photos prevent misunderstandings about lot sizes, which is crucial since buyers often misjudge space from images alone. Aerial shots, in particular, benefit from this, as they reveal neighboring features and overall scope. Real estate agents report that listings with marked boundaries get more inquiries, as they answer key questions upfront.
How adding property lines in Photoshop boosts buyer understanding and visual trust.
By overlaying lines, you create a professional touch that signals accuracy and attention to detail. This builds buyer confidence, especially in competitive markets where trust is a key factor in influencing offers. Studies from real estate platforms show enhanced visuals can increase engagement by up to 20%, making your listings more memorable.
Who should use this method – DIY real estate photographers, agents, and property editors
This approach suits anyone handling visuals: agents editing on the fly, photographers polishing shoots, or editors streamlining batches. No advanced skills needed—just basic Photoshop knowledge to start adding property lines efficiently.
Preparing Your Image Before Drawing Property or Boundary Lines
Selecting the right drone or aerial photo to highlight lot edges
Choose high-resolution drone images captured at midday for even lighting and minimal shadows. Focus on shots that capture the entire lot from above, ensuring edges align with natural features like fences or roads for easier tracing. Avoid overly zoomed-in views; opt for ones showing context to make boundary overlays more impactful.
How to fix lighting, contrast, and alignment before creating property lines in Photoshop
Start by duplicating your layer (Ctrl+J or Cmd+J). Use Levels (Image > Adjustments > Levels) to balance shadows and highlights. Boost contrast with Curves for crisp edges. These tweaks ensure lines stand out without clashing with the photo’s tones.
Straightening horizons and adjusting perspective for better accuracy
Go to Edit > Transform > Rotate to level horizons. For perspective fixes, use the Crop Tool with the Straighten option or Lens Correction filter. Accurate alignment prevents distorted boundaries, making your aerial property outline in Photoshop look professional.
Using Reference Maps to Add Accurate Real Estate Lot Lines
How to find property maps from county or GIS sites
Access free GIS resources from county websites, like Outagamie County’s Parcel Viewer or Los Angeles County’s interactive apps. Search by address to download parcel maps showing exact boundaries. These public tools provide reliable data for precise overlays.
Importing those maps into Photoshop as overlay layers
Open your drone photo, then File > Place Embedded to import the map. Position it over the image. Use Free Transform (Ctrl+T or Cmd+T) to rotate and align key points like corners or roads.
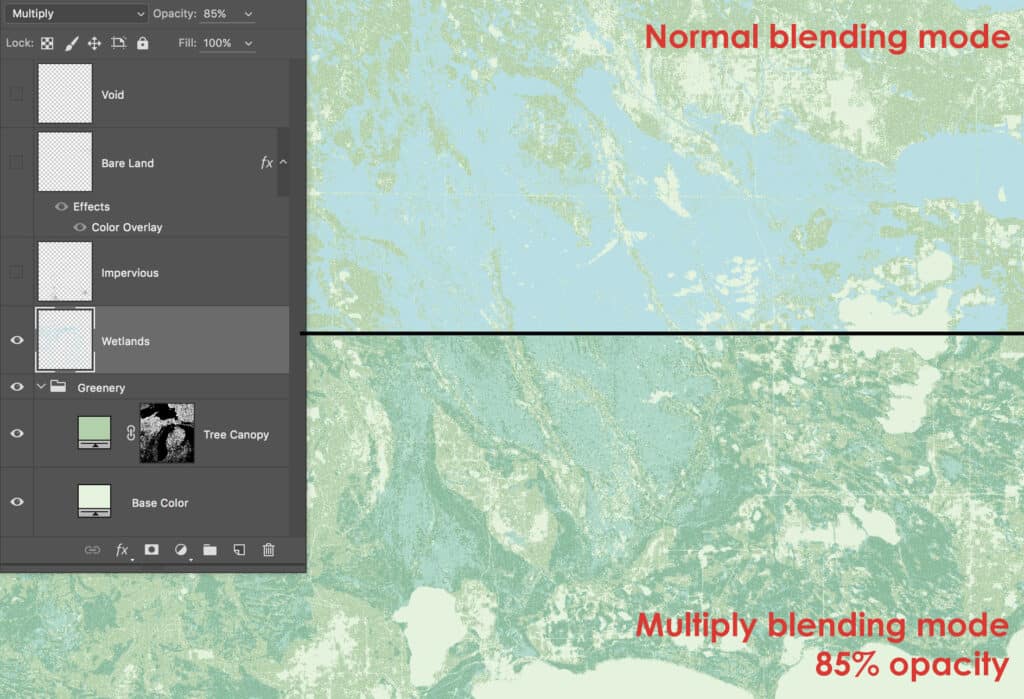
Adjusting transparency and scale to match your drone image
Lower the map layer’s opacity to 50% for visibility. Scale with Free Transform, holding Shift for proportion. Match landmarks precisely to ensure the property boundary overlay is spot-on.
Step-by-Step Guide – Drawing Property Lines in Photoshop
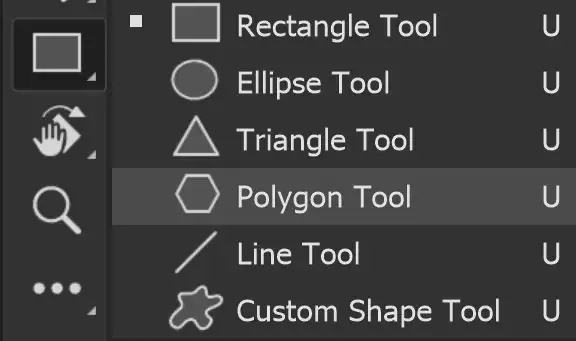
Method 1: How to use the Polygon Tool to add property lines in Photoshop
The Polygon Tool excels for straight-edged lots.
Step-by-step guide to outline rectangular or square properties
- Select the Polygon Tool from the toolbar (nested under the Rectangle Tool).
- Set Sides to 4 for rectangles.
- Click corners sequentially to form the shape.
- Close by clicking the starting point.
Adjusting line thickness and color for visibility
In the Options bar, set Stroke to 5-10 px and choose a bright color like white or red. This makes lines pop against green lawns or blue skies.
Method 2: How to use the Pen Tool to draw irregular real estate lot boundaries
For curved or odd-shaped lots, the Pen Tool offers flexibility.
Clicking anchor points to trace property shapes
Select the Pen Tool (P). Click to place anchors along edges. For curves, click and drag to adjust handles.
How to add dashed lines in Photoshop for professional outlines
After tracing, right-click the path > Stroke Path. In Brush settings, enable Simulate Pressure and set Spacing to 150% for dashes.
Enhancing the Property Line Layer for Real Estate Visuals
Customizing ruler lines and grid lines for precise alignment
Enable Rulers (Ctrl+R or Cmd+R) and drag guides to align. View > Show > Grid adds an overlay for accuracy.
How to add dimension lines in Photoshop to show measurements
Use the Line Tool with arrowheads (Options bar). Add text layers for measurements, like “50 ft.”
Adjusting stroke opacity and color contrast for visibility
Set layer opacity to 70-80%. Choose contrasting colors based on the photo—yellow on dark areas.
Creating soft glows or drop shadows to make boundary lines pop
Add Layer Style > Outer Glow with a subtle spread. This enhances visibility without overwhelming the image.
Exporting and Optimizing the Edited Property Photo for MLS or Online Listings
Choosing the best image format (JPEG, PNG) for real estate platforms
JPEG for smaller files with good quality; PNG if transparency is needed for overlays.
Optimizing aerial property outline images for web and mobile users
Use Image > Image Size to resize to 2000px wide. Save for Web (Legacy) with 70-80% quality.
Using alt text and file names with property lines, and Photoshop keywords for better SEO
Name files like “aerial-property-outline-photoshop-example.jpg.” Add alt text: “Drone photo with added property lines in Photoshop for real estate listing.”
Advanced Methods to Create Professional Property Boundary Overlays
How to add real estate property boundary lines to drone photos with map accuracy
Import GIS maps as layers, align, and trace paths for precision beyond manual drawing.
Using Photoshop’s vector paths to mark land boundaries automatically
Record an Action: Select Pen Tool, trace a sample, then play on batches for consistency.
Exporting your property line layer to video or animation for marketing
Layer > Video Layers > New Video Layer from File. Animate lines fading in for dynamic tours.
Automating line creation using Photoshop Actions for multiple lots
Go to Window > Actions. Record steps like stroking paths, then batch apply via File > Automate > Batch.
Common Mistakes to Avoid When Adding Property Lines in Photoshop
Drawing inaccurate lines that don’t match the actual lot maps
Always cross-reference with GIS data to avoid legal issues or buyer disputes.
Using faint or thin strokes that disappear on mobile screens
Test on devices; opt for 5px+ thickness and high-contrast colors.
Forgetting to use ruler lines and grids for alignment
Skipping these leads to crooked overlays—enable them early.
Saving only the final image without keeping a layered PSD file
Preserve PSDs for edits; export flats separately.
Bonus Tips and Resources for Real Estate Photo Editing
Keyboard shortcuts for the Pen Tool and Shape Tools in Photoshop
| Tool/Function | Windows Shortcut | Mac Shortcut |
| Pen Tool | P | P |
| Add Anchor Point | + | + |
| Delete Anchor Point | – | – |
| Convert Point Tool | Alt (hold) | Option (hold) |
| Cycle Shape Tools | Shift+U | Shift+U |
Downloadable property line templates and grid overlays
Check Adobe’s stock or sites like GraphicRiver for free PSD templates.
Top YouTube tutorials for creating property boundaries visually
- “How to Add Real Estate Property Boundary Lines to Drone Photos” by Bendigo Aerial.
- “Draw Property Lines in Photoshop – Fast Plot Line Tutorial” by Dave Koch Photo.
Adding disclaimers like “Approximate boundary – confirm with survey”
Place text layers at the bottom: “Boundaries approximate; verify with official survey.”
Frequently Asked Questions About Adding Property Lines in Photoshop
What tools in Photoshop should I use to draw property boundary lines?
Use the Pen Tool for irregular shapes by clicking anchors and dragging for curves. The Polygon Tool suits rectangular lots—set sides and click corners. Shape Tools like Line work for straight segments. Pen fits complex lots, Polygon for squares, and Shapes for basics.
How do I add dashed property lines in Photoshop for a more professional look?
Draw your path with the Pen Tool. Right-click > Stroke Path > Brush. In Brush settings, select the Dashed Line preset or adjust Spacing to 150%. Dashed lines keep photos clean while clearly marking boundaries.
Can I add grid or ruler lines in Photoshop to align my property outlines accurately?
Yes, go to View > Rulers to enable, then drag guides. For grids, View > Show > Grid. These snap lines straight, ensuring alignment with photo features.
What’s the best way to import property maps or lot overlays into Photoshop?
Search county GIS sites by address for parcel maps. Download and Place Embedded in Photoshop. Scale and set the opacity to overlay accurately on your photo.
How can I make sure property lines look clear on mobile devices and online listings?
Choose bold colors like white or cyan, 5-10px thickness. Export as high-quality JPEG at 2000px width. Test on phones for visibility.
Can I automate drawing property boundaries in Photoshop when editing multiple photos?
Record an Action: Window > Actions > New Action. Perform steps like stroking paths, then stop recording. Use File > Automate > Batch for multiples. Manual tweaks work best for unique lots.
How should I save my file to edit property lines later or reuse them for other projects?
Save as PSD to keep layers editable. Export flattened JPEG/PNG for uploads.
Are there any legal or branding concerns when showing property lines on photos?
Add disclaimers: “Approximate boundaries—confirm with survey.” Include watermarks to protect your work.
What’s the difference between drawing property lines in Photoshop and using mapping software?
Photoshop offers visual customization like glows; mapping software like GIS provides data accuracy but less styling flexibility. Use Photoshop for marketing polish.
How long does it take to add property lines to one photo in Photoshop?
10-20 minutes for simple rectangular lots; 30+ for complex. Templates and Actions speed it up.
Conclusion – Visualizing Real Estate Boundaries with Confidence
Why adding property lines in Photoshop makes listings stand out
It differentiates your photos, drawing more views in crowded markets.
How professional photo editing helps buyers visualize space better
Marked boundaries clarify layouts, aiding quicker decisions.
Encourage readers to practice and experiment with different line styles
Try dashes, glows, and colors on sample images to find your style.
Ready to elevate your real estate photo editing? Practice how to add property lines in Photoshop today and watch your listings shine. For more tips, subscribe to our newsletter or explore our editing services.
Integrating Property Line Layers into Real Estate Branding Workflows
Adding company logos or watermarks inside property boundaries
Place your logo on a new layer within the boundary shape. Blend with Overlay mode for subtle integration.
Creating branded “Before-After” shots for social media promotion
Duplicate the image: one without lines, one with. Use side-by-side layouts in posts to showcase edits.
Building a reusable Photoshop template for future property listings
Create a PSD with pre-set layers for lines, grids, and disclaimers. Save as a template for quick starts on new projects.
Want to improve your real estate listing images? We are here with 12+ years of experience in property listing image editing. We served over 100+ real estate companies with our expert editing skills.