How to Create a 3D Packshot Ghost Mannequin Effect for Product Photography
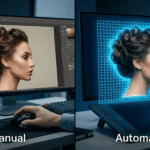
Imagine browsing your favorite clothing website. A beautiful sweater catches your eye. The garment seems to hover in mid-air. It spins smoothly, showing every detail. No model or mannequin interrupts your view. This captivating display demonstrates how to create a 3D packshot ghost mannequin effect.
How to create a 3D packshot ghost mannequin effect turns basic product images into professional showcases. This method blends invisible mannequin techniques with full 360-degree views. The outcome engages shoppers and drives sales dramatically.
Today’s makers and 3D printing hobbyists can access this sophisticated approach. Current technology enables studio-quality results to be achieved at home. This comprehensive guide covers each phase of the workflow.
Summary Table: 360° Packshot Ghost Mannequin Effect
| Feature | Information |
| Description | A method merging ghost mannequin techniques with 360° product displays |
| Ideal For | Fashion retailers, online shops, and product demonstrations |
| Advantages | Hidden support effect, complete rotation, increased interaction, improved sales |
| Equipment Needed | Digital camera, stable mount, rotating platform, image editing programs |
| Abilities Required | Photography skills, digital compositing, image enhancement, sequence creation |
| Final Formats | Interactive web viewer, animated GIF, or rotating video file |
What Is the 360° Packshot Ghost Mannequin Effect?

360° packshot ghost mannequin effect showing realistic floating garment display
The 360° packshot ghost mannequin effect produces realistic, spinning 3D product displays. This approach photographs clothing items on support forms from numerous positions. Advanced editing then eliminates the support structure.
The workflow involves capturing 24-36 photographs around a complete circle. Every image reveals the item from a fresh perspective. Specialized programs merge these shots into fluid motion. The end product displays garments as if floating in space.
This technique excels particularly with fashion photography. Tops, bottoms, outerwear, and accessories all benefit from this approach. The method reveals silhouette, texture, and movement naturally. Shoppers observe exactly how items would appear when worn.
Contemporary online retail relies heavily on effective visual communication. Single photographs rarely show sufficient product information. The ghost mannequin approach fills this void successfully. It offers comprehensive views without distracting elements.
Why is the 360° Ghost Mannequin Effect Important for E-commerce?
Improved Customer Engagement
Interactive displays revolutionize online shopping experiences. Buyers can spin products at will. They investigate every aspect at their preferred speed. This freedom extends browsing time considerably. Professional ghost mannequin techniques boost online revenue through engaging presentations.
Comprehensive Product Examination
Standard images reveal limited viewpoints. The rotating effect showcases textures, designs, and build quality. Shoppers study seams, material flow, and craftsmanship details. This openness creates purchase confidence.
Removes Unwanted Distractions
Traditional support forms often compete with products for attention. Human models sometimes overshadow the merchandise. Ghost mannequin methods eliminate these interruptions. The clothing becomes the exclusive center of focus.
Increases Sales and Credibility
A professional display raises product value perception significantly. Interactive 3D ghost mannequin displays can transform your online store by offering customers realistic and immersive product experiences. Research indicates 360° product presentations boost sales by approximately 40%.
Lowers Expenses and Duration
Standard fashion shoots require costly talent. Organizing sessions becomes complicated and expensive. Ghost mannequin approaches remove these costs. Solo photographers can manage complete projects efficiently.
Maintains Brand Consistency
Each item receives an identical presentation with this approach. Illumination, perspectives, and styling stay uniform. This consistency reinforces brand recognition significantly. Product collections appear polished and coordinated throughout.
How to Create a 360° Packshot Ghost Mannequin Effect Step-by-Step

Before and after comparison showing the ghost mannequin removal process for 3D packshots
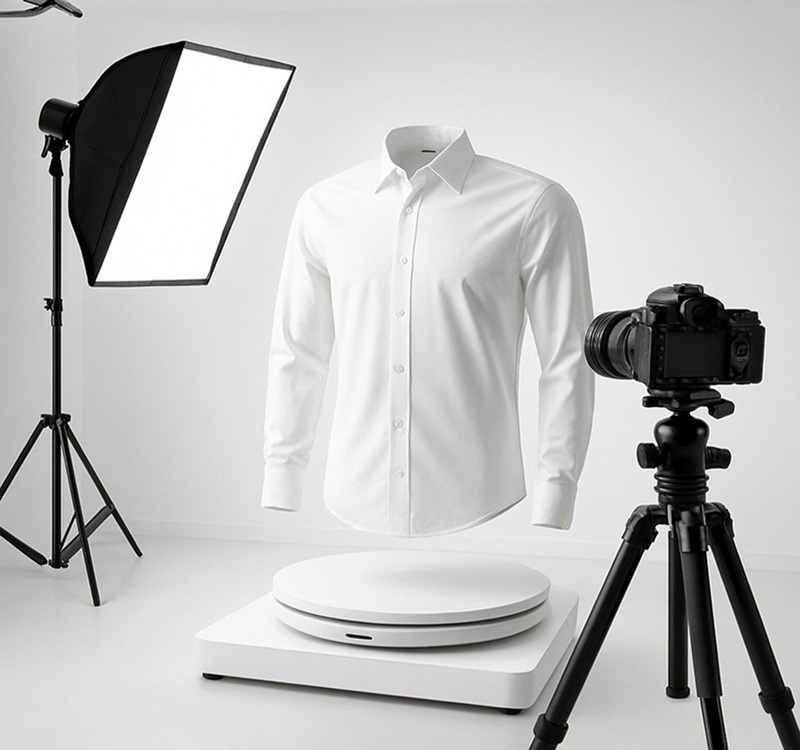
Phase 1: Establish Studio and Equipment

Professional lighting setup diagram for optimal ghost mannequin photography results
Configure your shooting environment with steady lighting conditions. Arrange two light sources at opposing 45-degree positions. Install a neutral backdrop behind the work area. This arrangement provides balanced illumination during rotation.
Secure your camera on a reliable support at mid-torso height. Align the support with the rotating surface below. Label the platform with 24-36 equally distributed markers. These guides ensure uniform spacing between captures.
Verify your camera configurations before beginning. Employ manual settings to preserve steady exposure. Keep ISO within the 100-400 range for superior image clarity. Select aperture around f/8-f/11 for consistent sharpness.
Phase 2: Style the Mannequin
Pick a detachable support form matching your garment dimensions for your 3D packshot ghost mannequin effect setup. Arrange and secure fabric thoughtfully for optimal appearance. Prevent excessive stretching that creates unnatural contours. Fix loose sections with clips placed strategically.
Focus extra attention on the neckline and arm areas when preparing how to create a 3D packshot ghost mannequin effect. These zones need the cleanest presentation achievable. Insert foam supports or backing inside items when required. This reinforcement preserves proper structure during photography.
Detach mannequin sections that require later removal. Many commercial forms include removable neck and limb pieces. This feature streamlines the editing workflow considerably.
Phase 3: Capture in Sequences
Record the primary rotation series first with the form in position. Turn the platform gradually between each frame. Keep identical lighting and camera placement throughout. Shoot 24-36 images for smooth, complete rotation.
Extract the form and photograph interior features separately. Document neckline interiors, sleeve openings, and reverse sections. Apply identical lighting arrangements for consistency. These images will be merged during post-processing.
Take supplementary detail photographs as necessary. Macro shots of materials, tags, or unique elements add information. Preserve matching perspective and lighting setups. These extra images improve the final display.
Phase 4: Blend Images
Load all photographs into editing software for processing. Build layer masks to eliminate form sections precisely. Apply accurate selection methods for neat borders. Keep uniform background tones across all images.
Combine interior detail captures with the primary rotation series. Integrate these components naturally using blending techniques. Modify transparency and masking when needed. The result should look completely organic.
Balance colors across all images for uniformity. Align brightness, contrast, and color intensity throughout the sequence. Apply correction layers for reversible editing. This consistency proves essential for smooth animation.
Phase 5: Build the Display
Select suitable programs for developing the interactive presentation. WebRotate360, Sirv, and similar platforms provide excellent capabilities. Each solution offers distinct features and cost structures.
Load your edited image series into the selected program. Configure playback rates between 12-24 frames per second. Faster rates produce smoother motion but enlarge file sizes. Balance quality with loading performance carefully.
Output the completed result in your desired format. HTML5 displays optimally for websites. Animated files suit social platforms. Video formats provide superior compression ratios.
What Equipment and Software Do You Need?

Essential equipment needed for creating professional ghost mannequin 360° packshots
Core Camera Gear
| Equipment Type | Budget Option | Professional Option | Key Benefits |
| Camera Body | Canon EOS Rebel, Sony Alpha a6000 | Canon 5D Mark IV, Sony a7R IV | Consistent image quality, manual controls |
| Tripod | Aluminum adjustable tripod | Carbon fiber professional tripod | Stability, vibration control, and positioning |
| Turntable | Manual lazy susan | Motorized 360° platform | Precise rotation, automation capability |
A digital camera system anchors your complete setup. Entry-level options like Canon EOS or Sony Alpha models perform admirably. High-end cameras deliver superior image quality, but aren’t required. Emphasize consistency over expensive equipment.
Purchase a solid support system for camera stability. Carbon fiber models provide excellent vibration control. Adjustable height and angle features enhance positioning flexibility. Stability directly influences final image sharpness.
Illumination Equipment
| Lighting Type | Cost Range | Best Use Case | Advantages |
| Softbox Lights | $100-$500 | Main illumination | Even light distribution reduces shadows |
| LED Panels | $80-$300 | Continuous lighting | Consistent color, no heat buildup |
| Ring Light | $50-$200 | Close-up details | Uniform circular lighting, portable |
| Reflectors | $20-$80 | Fill lighting | Affordable, lightweight, versatile |
Softbox lighting delivers the most appealing illumination. Two-light arrangements work effectively for most situations. Position lights at 45-degree angles from the subject. This setup reduces harsh shadows efficiently.
LED panels maintain consistent color temperature during extended sessions. Unlike conventional bulbs, LEDs don’t generate significant heat. This stability prevents color variations during prolonged shoots.
Editing Software
| Software | Price | Best For | Key Features |
| Adobe Photoshop | $20.99/month | Advanced compositing | Layer masking, clone tools, precise editing |
| Adobe Lightroom | $9.99/month | Batch processing | Color correction, exposure control, workflow |
| GIMP | Free | Budget editing | Basic masking, layer support, open-source |
| WebRotate360 | $49-$199 | 360° viewers | Interactive displays, e-commerce integration |
| Sirv | $19-$99/month | Cloud hosting | CDN delivery, optimization, analytics |
Adobe Photoshop continues as the professional standard for composite work. Its sophisticated masking capabilities handle complex form removal tasks. Layer-based editing enables non-destructive workflow methods. Subscription models make professional tools affordable.
Where Is the 360° Ghost Mannequin Effect Used?
Online Retail Platforms
Internet merchants apply this technique broadly across product categories. Fashion companies display clothing collections with professional excellence. Interactive 360° ghost mannequin presentations enhance product photography for leading online marketplaces.
Amazon, eBay, and Shopify vendors benefit from enhanced product display. Interactive images boost customer involvement significantly. Greater involvement usually converts to better sales results.
Digital Collections and Style Guides
Fashion collections integrate 360° displays for premium presentation. Physical catalogs employ QR codes connecting to interactive versions. This combined strategy merges traditional and digital marketing successfully.
Brand style guides showcase rotating product displays prominently. These presentations communicate excellence and careful attention to detail. A professional display reflects favorably on brand image.
Social Media Promotion
Instagram and Facebook content featuring spinning products attracts attention efficiently. Video formats perform particularly well on these networks. Brief, repeating animations engage audiences quickly.
TikTok and YouTube creators employ this technique for product evaluations. The professional look adds authority to suggestions. Viewers value thorough product examination opportunities.
Commercial Photography Studios
Professional photographers provide 360° ghost mannequin services to customers. This specialized offering commands premium rates in the marketplace. Studios purchase automated equipment for productivity.
Independent photographers can distinguish their services with this technique. Small business customers especially appreciate an affordable professional presentation. The equipment investment generates returns rapidly.
Common Challenges and How to Overcome Them

Common ghost mannequin photography challenges and their professional solutions
Inconsistent Product Positioning
Irregular placement creates jarring transitions in completed animations. Mark platform positions accurately with tape or markers. Apply camera grid lines to keep consistent framing. Monitor alignment regularly during shooting sessions.
Digital correction programs can repair minor positioning errors in post-processing. Adobe After Effects provides stabilization features for image sequences. However, achieving alignment during shooting conserves editing effort.
Complex Mannequin Removal
Intricate form shapes challenge experienced editors. Capture additional reference images without forms when feasible. Apply consistent lighting to simplify masking tasks. Consider purchasing specialized forms designed for easy elimination.
Develop reusable automated processes for repetitive tasks. These automated workflows accelerate form removal significantly. Distribute processes across team members for consistency.
Extended Processing Times
Handling 24-36 images individually becomes laborious quickly. Batch processing features in editing software manage basic corrections efficiently. Establish consistent workspace arrangements to accelerate manual tasks.
Explore outsourcing editing to specialized services for high-volume projects. Professional retouchers complete work faster and often more precisely. Calculate whether time savings warrant the cost.
Slow-Loading Interactive Displays
Large file sizes frustrate website visitors with limited internet speeds. Optimize image dimensions for web delivery without sacrificing quality. Use progressive formats for faster loading. Implement content delivery networks for global performance.
Test loading performance on various devices and connection speeds. Mobile users especially struggle with oversized files. Balance image quality with practical usability needs.
Advanced Tips to Optimize Your Ghost Mannequin 360° Packshots
Form Selection and Setup
Select forms that closely resemble your target customer demographics. Size and proportion accuracy enhances garment presentation dramatically. Adjustable forms accommodate various clothing dimensions effectively.
Arrange garments naturally without creating artificial shapes. Prevent over-securing or stretching materials unnaturally. Natural drape and fit appear more attractive to customers. Use minimal fasteners positioned strategically outside primary view areas.
Camera Placement and Configuration
| Garment Type | Camera Height | Aperture Setting | ISO Range | Focus Point |
| Shirts & Jackets | Chest level (4-5 feet) | f/8 – f/11 | 100-400 | Center of the garment |
| Pants & Skirts | Hip level (3-4 feet) | f/8 – f/11 | 100-400 | Waistline area |
| Dresses | Mid-torso (4 feet) | f/8 – f/11 | 100-400 | Bust/waist transition |
| Accessories | Product level | f/5.6 – f/8 | 100-200 | Product center |
Position cameras at suitable heights for different garment categories. Mid-torso level works optimally for shirts and jackets. Hip-level suits, pants, and skirts fit better. Consistent placement across product lines creates unified catalogs.
Keep identical camera configurations throughout complete sequences. Manual exposure mode prevents variations between shots. Fixed white balance ensures color uniformity. These technical elements directly impact final quality.
Recording Comprehensive Views
| Shot Type | Purpose | Timing | Special Notes |
| Rotation Sequence | Main 360° view | With mannequin | 24-36 evenly spaced shots |
| Interior Details | Collars, pockets, linings | Without mannequin | Same lighting setup |
| Texture Close-ups | Fabric details, tags | Without mannequin | Macro lens recommended |
| Construction Views | Seams, stitching, hardware | Without mannequin | Focus on quality indicators |
Photograph front, rear, and interior perspectives systematically. Interior shots of collars, pockets, and linings provide valuable detail. Macro images highlight fabric textures and construction quality. Complete coverage serves customer information needs effectively.
Document shooting workflows with notes and diagrams. Consistent procedures produce predictable results. Team members can duplicate successful setups easily. This documentation proves valuable for future projects.
Processing Workflow Enhancement
Create standardized editing procedures for productivity when learning how to create a 3D packshot ghost mannequin effect. Build automated action sets for repetitive tasks. Establish consistent file naming systems across projects. These organizational steps prevent errors and confusion.
Eliminate forms carefully while preserving garment shapes naturally. Keep clean backgrounds throughout image sequences. Modify exposure and contrast consistently across all frames. Retouch minor flaws for polished final results.
Apply layer-based editing methods for maximum flexibility in your 3D packshot ghost mannequin workflow. Non-destructive adjustments enable easy revisions later. Store working files with layers preserved for future modifications. This approach protects your time investment effectively.
Why Select PixcRetouch for Professional Ghost Mannequin Services For Online Retailers And Clothing Companies?
When choosing a Professional Ghost Mannequin Services For Online Retailers And Clothing Companies specialist, PixcRetouch emerges as a top option for digital commerce enterprises and apparel businesses globally. Their ghost mannequin retouching begins at only $0.20 per photograph, with substantial volume reductions offered, creating accessible professional product imagery for companies across all market segments.
Frequently Asked Questions
What is a 360° packshot?
A 360° packshot creates a fully rotatable product image that provides an interactive online view. Customers can drag to spin the product and examine it from every perspective. This technology functions through a series of photographs captured around the product, then assembled into an interactive display.
What does ghost mannequin mean in photography?
Ghost mannequin photography creates the appearance of worn clothing without showing a visible model or support form. The support structure gets digitally eliminated during editing, leaving only the garment shape. This produces a professional, distraction-free product presentation.
Why combine ghost mannequin and 360° packshots?
Merging these methods delivers a clean presentation with complete product visibility. Customers observe realistic garment shapes from every perspective without model interruptions. This combination boosts customer confidence and typically enhances conversion rates significantly.
Do I need professional gear?
Basic equipment can generate acceptable results for small enterprises. However, premium outcomes generally demand specialized equipment like motorized platforms and professional lighting. Begin with essential gear and upgrade as your enterprise expands.
How many photos for a 360° spin?
Most 360° rotations employ 24 to 36 evenly distributed shots around the product. Additional photos generate smoother rotation, but expand file sizes and editing duration. Fewer photos may appear choppy during rotation. Experiment with different quantities to discover your optimal balance.
Can I use my smartphone for this technique?
Modern smartphones can record adequate images for ghost mannequin photography. However, consistent lighting and positioning become more challenging without mounting accessories. Consider smartphone additions like mounts and external lighting for improved results.
How long does the editing process take?
Editing duration varies greatly depending on complexity and skill level. Simple garments might need 2-3 hours per 360° sequence. Complex items with detailed form removal could require 6-8 hours. Experience and efficient workflows reduce editing duration significantly.
What file formats work best for web display?
HTML5 interactive displays provide the optimal user experience on websites. They load quickly and function across all devices and browsers. Animated files work well for social media but have larger file sizes. Video files offer good compression but lack interactivity.
Transform Your Product Photography Today
Final ghost mannequin 360° outputs across different digital platforms and formats
The how to create a 3D packshot ghost mannequin effect technique transforms product presentation for modern enterprises. This powerful fusion of ghost mannequin photography and 360° rotation develops immersive shopping experiences. Customers interact more deeply with products they can examine thoroughly.
Professional results are now accessible with standard photography equipment. Small enterprises and creative entrepreneurs can compete with major retailers effectively. The investment in time and equipment generates returns through improved customer engagement.
Begin your ghost mannequin journey today with basic equipment and simple products. Practice the methods on personal projects before handling client work. Each project teaches valuable lessons that enhance your abilities significantly.
Ready to elevate your product photography? Share your ghost mannequin experiments in the comments below. Connect with other 3D printing enthusiasts exploring creative photography techniques. Your success stories inspire others to start their visual transformation journeys.