How to Do Furniture Photo Editing for E-Commerce: Best Guide
Your furniture images are the first impression customers get of your products. In the competitive world of e-commerce, poor-quality photos can instantly drive potential buyers away, while professionally edited images can dramatically boost your sales and reduce returns. Studies show that 78% of shoppers consider product photos the most influential factor in their buying decisions (BigCommerce), and poor-quality images can lead to a 30% return rate (Invesp).
How to do furniture photo editing for e-commerce isn’t just about making pictures look pretty—it’s about creating compelling visuals that accurately represent your products and build customer trust. Whether you’re selling vintage chairs or modern sofas, this guide will show you exactly how to transform raw photos into sales-driving product images.
Let’s dive into the complete process that professional photo editors use to create stunning furniture images that convert browsers into buyers.
Why Proper Furniture Photo Editing is Critical for Your E-Commerce Success

The statistics tell the whole story: 75% of online shoppers rely on product photos to make purchasing decisions, and poor images are responsible for 22% of product returns. For furniture, where customers can’t touch or test products before buying, photo quality becomes even more crucial.
Professional furniture photo editing builds trust by showing customers exactly what they’re purchasing. When you properly edit your furniture photos, you eliminate guesswork and reduce the anxiety that comes with buying expensive items online.
Clean, consistent editing also strengthens your brand identity. Customers recognize professional businesses by their attention to detail, and consistent photo styling across your catalog creates that professional appearance that encourages larger orders and repeat purchases.
Most importantly, well-edited furniture photos directly impact your bottom line. Studies show that products with high-quality images receive 94% more views and convert at rates up to 40% higher than those with poor photography.
Essential Tools for Furniture Photo Editing

Choosing the right editing software determines both the quality of your results and the efficiency of your workflow. Here’s what professional editors recommend for different situations:
Professional-Grade Software
Adobe Photoshop remains the gold standard for detailed furniture editing. Its advanced masking tools, perspective correction features, and precise color control make it perfect for high-end furniture brands that need pixel-perfect results.
Adobe Lightroom excels at batch processing and color management, making it ideal for stores with large inventories. You can apply consistent edits to hundreds of similar products, saving hours of manual work.
Budget-Friendly Alternatives
GIMP alternative to Adobe Photoshop, offers most of Photoshop’s functionality at no cost. While the interface isn’t as polished, it handles background removal, color correction, and shadow creation effectively for smaller businesses.
Canva provides quick editing solutions for basic adjustments. Its templates and preset filters work well for simple furniture pieces that don’t require extensive editing.
AI-Powered Solutions
Tools like Remove.bg and PhotoRoom use artificial intelligence to automate background removal and basic corrections. These are perfect for processing large batches of similar products quickly and consistently.
Step 1: Remove and Replace Backgrounds Properly


Background removal is often the most transformative step in furniture photo editing. A cluttered or inappropriate background immediately cheapens your product’s perceived value.
Clean Removal Technique
Start by using your software’s selection tools to carefully outline your furniture piece. Pay special attention to intricate details like carved wood, fabric textures, or metal hardware. Rush this step, and your final image will look amateurish.
For complex shapes, use a combination of selection tools. The pen tool works best for straight edges and smooth curves, while brush tools handle fine details like chair spindles or decorative elements.
Background Replacement Options
Pure white backgrounds work best for most e-commerce platforms. They create consistency across your catalog and ensure your products look professional on any website layout.
For lifestyle shots on your website, consider subtle neutral backgrounds that complement your furniture style. Light gray or cream backgrounds work well for most pieces without distracting from the product.
Maintain Natural Elements
When removing backgrounds, preserve natural shadows and reflections that help ground your furniture. These elements prevent your products from looking like they’re floating in space and add realism that customers trust.
Step 2: Correct Perspective and Alignment
Furniture photos taken with smartphones or at awkward angles often suffer from perspective distortion that makes pieces look unrealistic or unappealing.
Fix Lens Distortion
Use your editing software’s lens correction tools to eliminate barrel distortion or other optical issues. This is particularly important for wide furniture pieces like dining tables or sectional sofas.
Straighten Skewed Elements
Ensure all vertical and horizontal lines appear truly straight. Crooked furniture legs or tilted tabletops immediately signal unprofessional photography and can make structurally sound pieces appear defective.
Maintain Proper Proportions
Avoid overcorrecting perspective adjustments, which can make furniture appear unnaturally stretched or compressed. The goal is to show each piece as it would appear to someone viewing it straight-on at eye level.
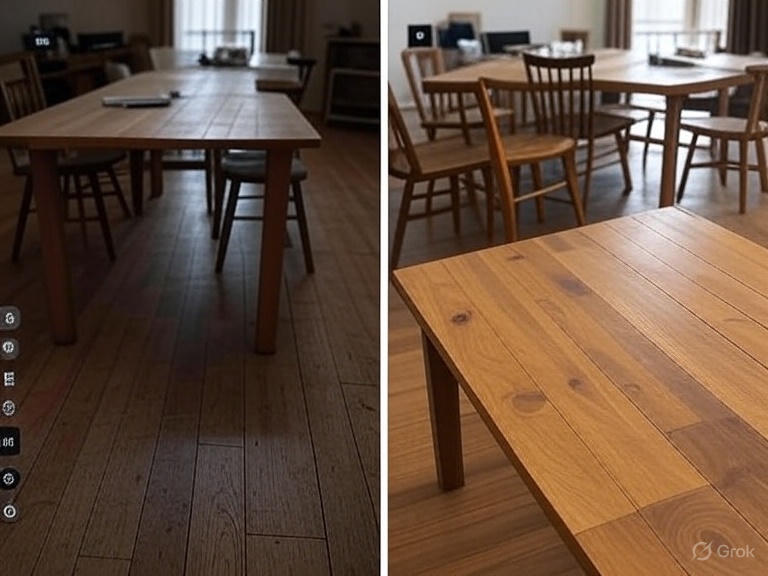
Step 3: Perfect Your Lighting and Colors

Accurate color representation is crucial for furniture sales, as customers need to know exactly what they’re purchasing for their homes.
Balance Overall Exposure
Adjust brightness and contrast to ensure your furniture is visible without being overexposed. Use your software’s histogram to guide these adjustments, aiming for a balanced distribution of light and dark tones.
Eliminate Color Casts
Remove unwanted color tints caused by indoor lighting or camera settings. This might involve adjusting white balance or using selective color correction to ensure accurate representation.
Enhance Natural Colors
Boost color saturation slightly to make your furniture more appealing, but avoid overdoing it. Colors should look vibrant and attractive while remaining true to the actual product.
Match Lighting Across Images
Maintain consistent lighting appearance across your entire catalog. This creates a cohesive brand look and makes your store appear more professional and trustworthy.
Step 4: Enhance Textures and Material Details

Texture enhancement helps customers understand the quality and feel of your furniture materials, which is crucial for online sales where touch isn’t possible.
Wood Grain Enhancement
For wooden furniture, carefully sharpen grain patterns to showcase quality and craftsmanship. Use subtle clarity adjustments to bring out natural wood character without making images look artificial.
Fabric and Upholstery Details
Enhance fabric textures to show weave patterns, pile direction, or surface characteristics. This helps customers understand material quality and make informed decisions about comfort and durability.
Metal Hardware Finishing
Polish metal elements like handles, legs, or decorative accents to show their true finish. Clean, bright hardware details suggest quality construction and attention to detail.
Avoid Over-Processing
Keep texture enhancements subtle and realistic. Over-sharpened or artificially enhanced textures can make products look fake and lead to disappointed customers when items arrive.
Step 5: Optimize Image Size and Format
Proper sizing ensures your furniture photos display perfectly across all platforms while loading quickly for optimal user experience.
Resolution Requirements
Target 2000×2000 pixels minimum for square images, with higher resolutions for detailed pieces. This provides enough quality for Zoom features while remaining web-friendly.
File Format Selection
Use JPEG format for most furniture photos, as it provides excellent quality at manageable file sizes. Save files at 85-90% quality for the best balance of appearance and loading speed.
Platform-Specific Sizing
Amazon requires a 1000×1000 pixel minimum with pure white backgrounds for main images. Shopify and other platforms offer more flexibility, but benefit from consistent sizing across your catalog.
Mobile Optimization
Remember that many customers shop on mobile devices. Test your images on various screen sizes to ensure they display clearly and attractively across all devices.
Step 6: Add Realistic Shadows and Reflections

Professional shadow work can dramatically improve your furniture photos by making products appear more three-dimensional and naturally placed.
Natural Drop Shadows
Create soft shadows that appear to fall naturally beneath your furniture. The shadow should match the lighting direction and intensity shown in your product photo.
Reflection Effects
For furniture with glossy finishes or glass elements, subtle reflections add elegance and realism. This technique works particularly well for modern pieces with clean lines.
Consistency Across Catalog
Maintain the same shadow style and intensity across all your product images. This consistency reinforces your professional brand image and creates visual harmony in your store.
Platform-Specific Editing Requirements

Different e-commerce platforms have varying image standards that affect how your furniture appears and performs in search results.
Amazon Marketplace Standards
Amazon‘s main image requirements include pure white backgrounds (RGB 255, 255, 255), minimum 1000×1000 pixels, and products filling at least 85% of the frame. Additional images can show lifestyle contexts.
Shopify Store Optimization
Shopify stores benefit from high-resolution images with consistent styling. You have more creative freedom with backgrounds and can use lifestyle settings to enhance your brand story.
Specialty Furniture Platforms
Wayfair, Overstock, and similar furniture-focused sites often have specific requirements for image quality and formatting. Check current guidelines for each platform you use.
Common Furniture Photo Editing Mistakes to Avoid
Even experienced sellers make these costly mistakes that can hurt sales and damage brand reputation.
Over-Editing Colors
Excessively vibrant or unrealistic colors lead to returns and negative reviews. Keep color adjustments subtle and accurate to the actual product.
Inconsistent Styling
Mixed shadow directions, varying background colors, or inconsistent lighting across your catalog looks unprofessional and confuses customers about your brand quality.
Poor Edge Quality
Rough or obvious selection edges around furniture pieces immediately signal amateur editing work. Take time to refine selections properly for clean, professional results.
Ignoring Mobile Display
Failing to test images on mobile devices can result in details that disappear on smaller screens, hurting your conversion rates with mobile shoppers.
Advanced Techniques for Competitive Advantage

These professional techniques can set your furniture images apart from competitors and justify premium pricing.
Lifestyle Integration
Create room mockups that show your furniture in realistic home settings. These images help customers visualize how pieces will look in their own spaces, reducing purchase anxiety.
360-Degree Views
Interactive spinning images allow customers to examine furniture from all angles. While more complex to create, these significantly increase engagement and conversion rates.
AR-Ready 3D Models
For high-end pieces, consider creating 3D models compatible with augmented reality apps. This cutting-edge technology lets customers virtually place furniture in their homes.
Quality Control Checklist for Professional Results

Before uploading any furniture image, verify these essential elements:
Technical Quality
- Clean, consistent backgrounds across all images
- Accurate colors that match actual products
- Proper resolution and file size for the intended platform
- Sharp focus on important details and textures
Visual Appeal
- Straight alignment and correct perspective
- Natural-looking shadows and lighting
- Enhanced but realistic textures and materials
- Consistent styling that reinforces your brand
Platform Compliance
- Meets minimum size requirements for each marketplace
- Follows background and content guidelines
- Optimized file sizes for fast loading
- Proper naming and metadata for SEO
Workflow for Efficient Batch Processing
Streamline your editing process to handle large furniture catalogs efficiently while maintaining consistent quality.
Organization System
Create clear folder structures for raw images, work-in-progress files, and finished products. This organization saves time and prevents errors during large editing projects.
Preset Development
Develop editing presets for common adjustments like white balance, basic exposure, and background removal. These presets ensure consistency while speeding up repetitive tasks.
Quality Control Process
Implement a systematic review process where finished images are checked against your quality standards before upload. This catches errors and maintains professional standards.
Measuring Success: How Good Editing Impacts Sales
Track these metrics to understand how improved photo editing affects your furniture business:
Conversion Rate Improvements
Monitor how editing changes affect the percentage of visitors who make purchases. Quality photos typically increase conversion rates by 20-40%.
Return Rate Reduction
Better product representation through accurate editing should reduce returns due to unmet expectations. Track this metric to measure editing effectiveness.
Customer Engagement
Watch for increased time spent on product pages, more image clicks, and higher engagement with zoom features when you improve photo quality.
When to Hire Professional Photo Editing Services
While DIY editing works for many businesses, certain situations call for professional help:
High-Volume Operations
If you’re processing hundreds of furniture images monthly, professional services can be more cost-effective than in-house editing time.
Complex Products
Intricate furniture pieces with multiple materials, complex shapes, or detailed craftsmanship often require expert-level editing skills.
Brand Positioning
Luxury furniture brands need flawless image quality to support premium pricing. Professional editing ensures your photos match your market positioning.
Best Tools for Furniture Photo Editing: Free vs Paid
| Tool | Type | Best For | Price |
| Photoshop | Paid | Professional edits | $$$ |
| Canva | Free/Paid | Quick basic edits | $ |
| Remove.bg | Free | Background removal | Free |
| PixcRetouch | Paid | Bulk eCom photo editing | $$$ |
Frequently Asked Questions
What’s the most important aspect of furniture photo editing?
Accurate color representation is crucial because furniture purchases are significant investments. Customers need to trust that what they see online matches what they’ll receive. Focus on precise color correction before other enhancements.
Should I use the same background for all furniture pieces?
Consistency is key to a professional appearance. Use white backgrounds for marketplace listings and maintain the same background style across your entire catalog for your website.
How can I make my furniture photos stand out from competitors?
Focus on showing fine details like wood grain, fabric texture, and hardware quality. Many sellers overlook these elements, but they’re crucial for communicating value and quality to online shoppers.
What resolution should I use for furniture photos?
Use at least 2000×2000 pixels for square images, with higher resolution for pieces where customers need to see fine details. This provides enough quality for Zoom features while maintaining reasonable file sizes.
Is it worth investing in professional editing software?
For serious furniture sellers, yes. Professional software provides the precision needed for high-quality results. However, start with what your budget allows and upgrade as your business grows.
Final Thoughts on Furniture Photo Editing Success
How to do furniture photo editing for e-commerce effectively comes down to understanding that every edit should serve the goal of accurately representing your products while making them as appealing as possible. The techniques covered in this guide—from background removal to advanced shadow work—form the foundation of professional product photography that drives sales.
Remember that great editing doesn’t mean dramatic changes. The best furniture photo editing enhances what’s already there while maintaining complete honesty about your products. This approach builds customer trust, reduces returns, and creates the foundation for long-term e-commerce success.
Start with the basics: clean backgrounds, accurate colors, and proper sizing. As you develop your skills and workflow, add advanced techniques like lifestyle integration and detailed texture enhancement. With consistent application of these principles, your furniture photos will stand out in crowded marketplaces and convert more visitors into satisfied customers.
You May Like To Read Our Other Blogs
1. Explore Creating the Perfect Product Photography Studio to discover essential setup tips and lighting tricks for a professional-quality studio that delivers stunning product photos every time.
2. Check out Photo Enhancement Services with Pixc Retouch to see how expert editing can boost image clarity, sharpness, and color for more impactful visuals that convert.
3. Read Advanced Techniques in High-End Photo Retouching and dive into premium editing methods that refine every detail—ideal for luxury, fashion, and beauty product images.
4. Visit Mastering Product Photography to learn proven techniques and insider strategies for capturing standout product shots that elevate your brand’s visual identity.
5. Don’t miss Jewelry Photography, where you’ll find specialized lighting setups, angles, and retouching tips for showcasing the brilliance of fine jewelry pieces.