Imagine capturing the raw emotion of a couple’s first kiss under golden hour light, only to realize back at your desk that harsh shadows and uneven tones threaten to dull the magic. That’s where knowing how to edit wedding photos in Lightroom comes in—transforming those moments into timeless treasures that clients cherish forever. As a seasoned photographer who’s handled hundreds of high-stakes shoots, I’ve seen firsthand how Lightroom streamlines the process, turning overwhelming galleries into polished stories.
This guide walks you through a proven workflow, from import to export, tailored for wedding pros. We’ll cover essential steps like culling with AI smarts, balancing exposures for radiant portraits, and applying presets for that consistent, pro-level vibe. Whether you’re tweaking engagement shots or batch editing a full day’s haul, these techniques draw from real-world experience to boost efficiency and quality.
Expect practical tips backed by industry pros, like using tone curves for moody depth or HSL sliders to make bouquet colors pop.
By the end, you’ll edit with confidence, delivering galleries that wow. Ready to elevate your bridal edits? Let’s dive in.
Why Lightroom Excels for High-Volume Wedding Galleries
Wedding shoots often yield thousands of images, from prep candids to reception dances. Lightroom shines here with its non-destructive editing, letting you tweak without altering originals. Batch processing syncs adjustments across similar shots—like applying white balance to all indoor ceremony photos in seconds—saving hours compared to per-image tweaks.
Its library module organizes chaos into collections, making it easy to sort by timeline or subject. For pros handling multiple events, dedicated catalogs keep things separate, preventing slowdowns. Plus, smart previews allow editing on the go via Lightroom Mobile, perfect for iPad touch-ups during travel.
Compared to other tools, Lightroom’s AI features, like auto-masking for subjects, speed up retouching faces or gowns without manual brushing. It handles RAW files effortlessly, preserving details in highlights and shadows that cheaper apps might crush. Photographers report cutting edit times by 50% using presets and sync, freeing focus for creative flair.
In short, for high-volume work, Lightroom delivers speed, organization, and quality that keep your business flowing. Integrate it with Photoshop for complex fixes, but rely on Lightroom as your core engine for consistent results.
Mindset Shifts to Build Confidence in Bridal Edits
Shifting from “fixing flaws” to “enhancing stories” transforms your approach. View each gallery as a narrative arc—cull for emotional peaks, not just technical perfection. This builds confidence by prioritizing client joy over pixel-peeping.
Embrace iteration: Start with broad strokes like exposure, then refine. Pros suggest editing in passes—first for consistency, second for polish—to avoid overwhelm. Trust your style; consistent edits reinforce your brand, whether natural or moody looks.
Overcome imposter syndrome by logging wins. Track how presets speed workflows or how client feedback improves. Seasoned editors recommend daily practice on sample shoots to hone instincts for mixed lighting or skin tones.
Finally, detach emotionally. Step away after a session to edit with fresh eyes, reducing fatigue. This mindset fosters bolder choices, like boosting vibrance for romantic tones, leading to galleries that resonate.
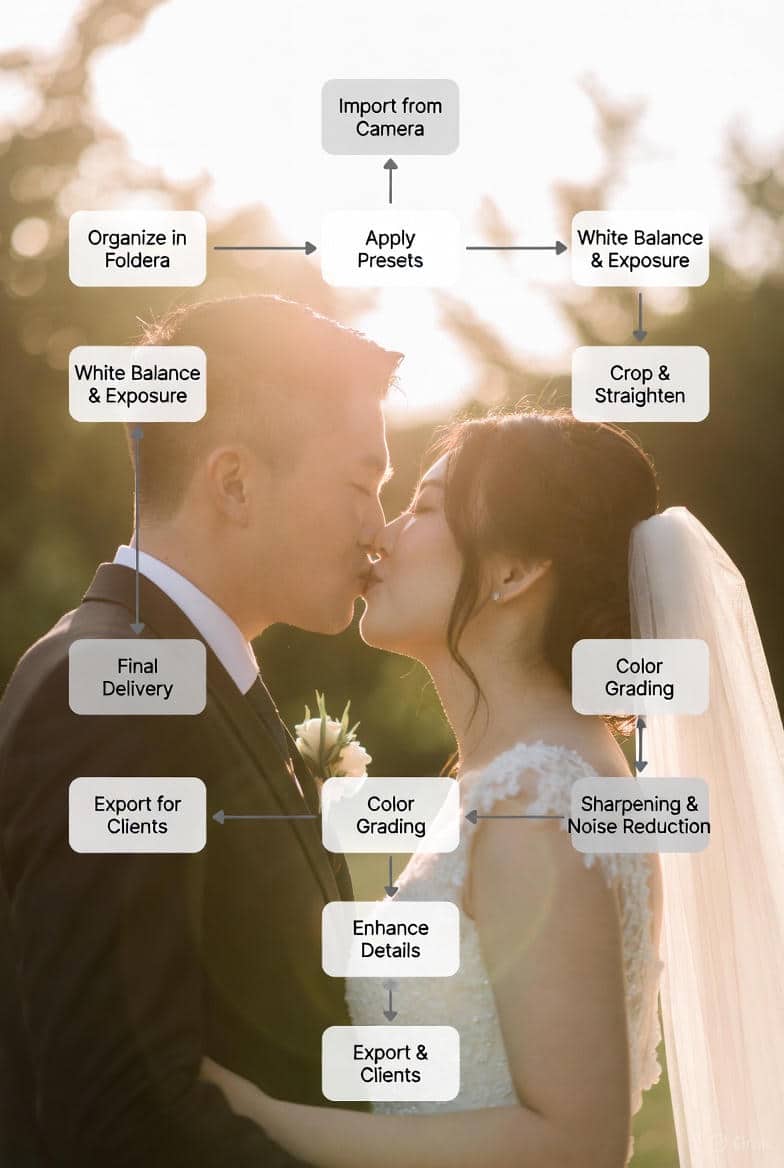
Workspace Setup: Import & Backup for Secure Management
A solid setup prevents disasters and streamlines editing. Begin by configuring Lightroom Classic for optimal performance—allocate more RAM in preferences and use external drives for storage.
Guided Import: Raw Files to Organized Folders
Import RAW files directly into dated folders, like “2025-11-10_WeddingName.” Use Lightroom’s import dialog to add keywords (e.g., “bride prep”) and apply a basic preset for lens corrections. This organizes from the start, making searches effortless.
Dedicated Catalogs & Smart Previews for Large Shoots
Create a new catalog per wedding to avoid bloat. Generate smart previews during import—they’re lightweight proxies for offline editing, ideal for laptop work on large shoots with 5,000+ images.
3-2-1 Backup: Local + Cloud Redundancy
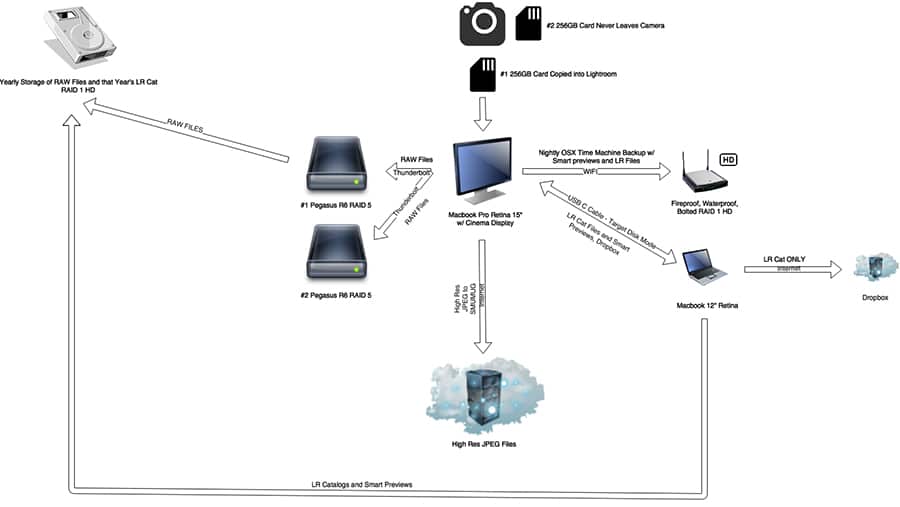
Follow the 3-2-1 rule: Three copies, two media types, one offsite. Copy to an external HDD, mirror to another, and upload to cloud services like Backblaze. Automate with Lightroom’s export or scripts for peace of mind.
This foundation ensures secure, efficient management, letting you focus on creative edits.
Culling: Select Top Images for Storytelling
Culling shapes your gallery’s narrative. Aim for 600-800 keepers from 5,000+ shots, focusing on moments that tell the couple’s story.
Flagging & Rating with Keyboard Shortcuts
Use P for picks, X for rejects in survey view. Rate 1-5 stars for quality—5 for heroes. Shortcuts like Caps Lock auto-advance speed this up.
AI Tools to Speed Up Culling
Leverage Lightroom’s AI for subject detection or similar image grouping. Tools like Aftershoot cull duplicates automatically, slashing time by 70%.
Avoid Pitfalls: Balance Story & Technical Quality
Don’t over-cull technically imperfect but emotionally rich shots. Ensure variety—include candids alongside formals. Review in slideshow mode for flow.
This step sets the tone, ensuring your final gallery captivates.
Exposure: Global Tone for Radiant Portraits
Global tone adjustments breathe life into portraits. Start in the Basic panel, dialing exposure to brighten faces without blowing highlights.
Recover Details in Highlights, Shadows, Whites
Slide Highlights down to reclaim sky details, boost Shadows for veil textures. Adjust Whites and Blacks for punch without clipping—use the histogram as your guide.
Tone Curve for Depth & Mood
S-curve adds contrast for depth; pull midtones up for airy moods. For dramatic bridal shots, deepen shadows subtly.
Harmonize Mixed Lighting Conditions
Sync edits across groups shot under similar lights. Use Auto for a starting point, then fine-tune for consistency in venues with tungsten and daylight mixes.
These tweaks create radiant, balanced images that pop.
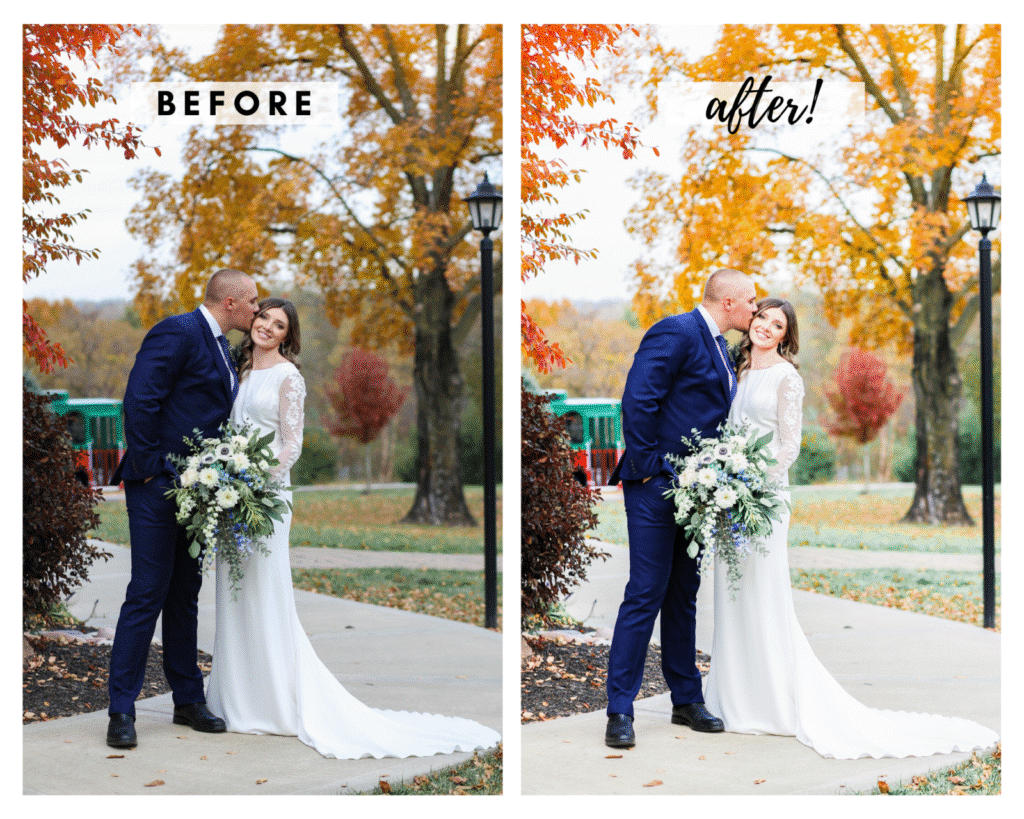
Color Correction: Lifelike Vibrancy
Colors evoke emotion—get them right for vibrant, true-to-life galleries.
Eyedropper for Neutral White Balance
Click the eyedropper on a neutral gray, like a white dress, to neutralize casts. Tweak Temp and Tint for warmth in golden hour shots.
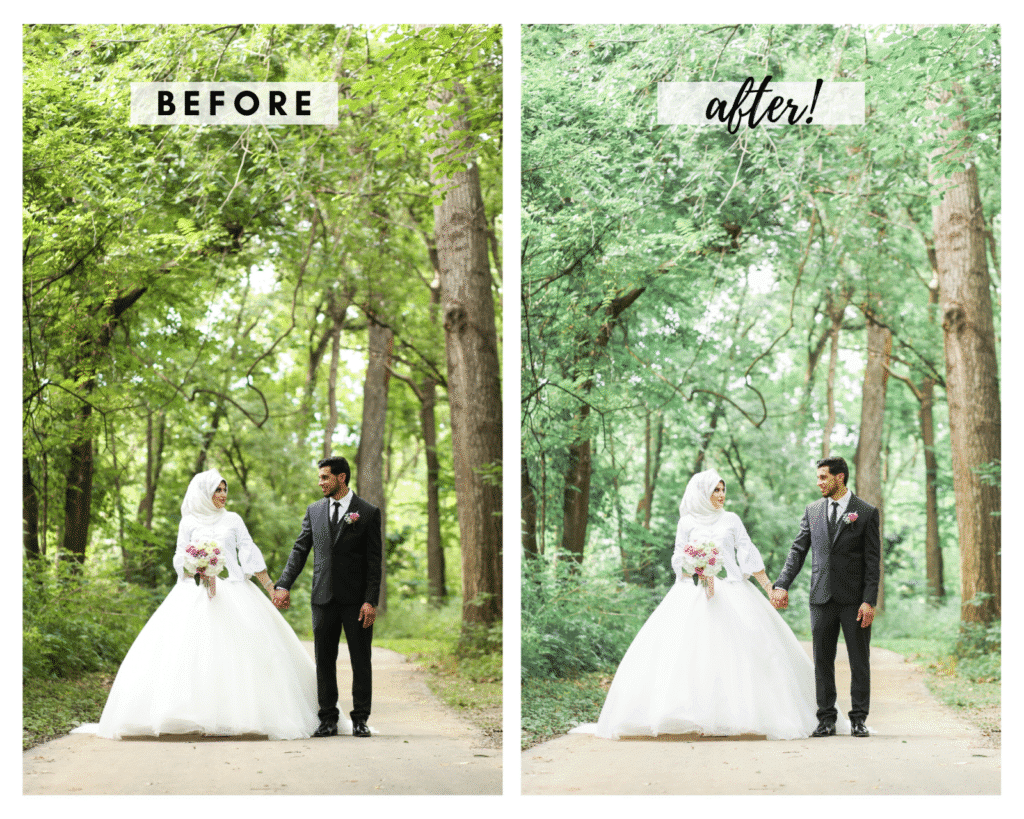
HSL Controls: Refine Greens & Bouquet Hues
Boost orange saturation for skin glow, desaturate greens to tame foliage. Luminance lifts bouquet pinks without overexposure.
Vibrance vs. Saturation for Romantic Tones
Favor Vibrance for subtle pops in muted tones; Saturation for bold accents. This keeps skin natural while enhancing romantic hues.
Result: Galleries with emotional depth and harmony.
Local Adjustments: Polished Details
Local tools refine specifics without global changes.
Dodge & Burn for Faces & Gowns
Use the Adjustment Brush to brighten faces (dodge) or darken distractions (burn). Flow low for a natural glow on gowns.
Filters to Tame Flares & Spotlights
Radial Filters reduce lens flares; Graduated for spotlight vignettes, pulling exposure down.
Healing Brush: Remove Distractions
Spot heal blemishes or exit signs. Content-Aware fills larger areas seamlessly.
These targeted edits polish without overdoing it.
Presets: Unified Style Across Galleries
Presets ensure consistency, speeding edits.
Anchor Shot Method for Custom Presets
Edit a key image fully, save as a preset. Apply to similar shots, tweak as needed.
Vintage Film Effects with Warmth & Grain
Add warmth via Split Toning, grain for filmic texture. Ideal for timeless looks.
Black & White: Contrast for Drama
Convert with B&W mixer, boost contrast for dramatic formals.
Custom presets build your signature style efficiently.
Detail Enhancement: Sharp & Clean Finals
Sharpen details for pro finals.
Reduce High-ISO Noise on Dance Floors
Apply AI Denoise to high-ISO shots; mask to protect edges.
Masked Sharpening for Florals & Rings
Sharpen selectively with masks—Amount 50-70 for rings, lower for skin.
Clarity & Dehaze for Texture & Atmosphere
Boost Clarity for textures, Dehaze for hazy atmospheres without over-sharpening.
Crisp, clean images ready for delivery.
Sustainable Workflow: Reduce Fatigue
Sustainability keeps you sharp.
Ergonomic Setup & Timed Breaks
Use standing desks, eye-level monitors. Take 5-minute breaks every hour.
Eco-Friendly File & Export Practices
Compress files, use energy-efficient drives. Batch exports minimize processing.
These habits prevent burnout and maintain quality.
Export & Delivery: Client-Ready Files
Finalize for clients.
JPEGs for Social, TIFFs for Print
Export JPEGs at 80 quality for Instagram; TIFFs for prints.
Batch Export with Watermarks
Add watermarks via presets, batch for efficiency.
Book Module for Custom Albums
Design albums in the Book module, export PDFs for proofing.
Seamless delivery builds trust.
Pro Troubleshooting: Fast Fixes
Quick solutions for common issues.
Blend Flash & Natural Light
Balance with split toning; sync across flashed shots.
Shortcuts & Panel Hacks for Speed
Use J for grid, \ for before/after. Solo panels for focus.
Compare Mode for Final Validation
Reference view checks consistency.
These hacks resolve snags swiftly.
FAQs: How to Edit Wedding Photos in Lightroom
Average Editing Time per Wedding?
Expect 6-10 hours for editing 600-800 images after culling, depending on complexity. Full workflow, including import and export, spans 1-2 days for pros using batches and presets.
Seasonal Preset Tweaks?
Adjust for seasons: Warm tones for fall, cooler blues for winter. Tweak HSL for foliage in spring or snow whites in winter to maintain a natural look.
When to Switch to Photoshop?
Switch for advanced retouching like head swaps or complex composites. Lightroom handles 80-90% of wedding edits; use Photoshop for the rest to keep workflows efficient.
Conclusion: Your Lightroom Wedding Editing Blueprint
Mastering how to edit wedding photos in Lightroom boils down to a structured workflow: Cull ruthlessly, adjust tones and colors globally, refine locally, and export efficiently. This blueprint delivers consistent, emotional results that capture the day’s essence.
Key takeaway: Master how to edit wedding photos in Lightroom with culling, tone, color, and presets for consistent, emotional results.
If you want to restore your wedding images with proper edits, hassle-free, we can help you. Pixcretouch is a market-proven wedding image editing agency.