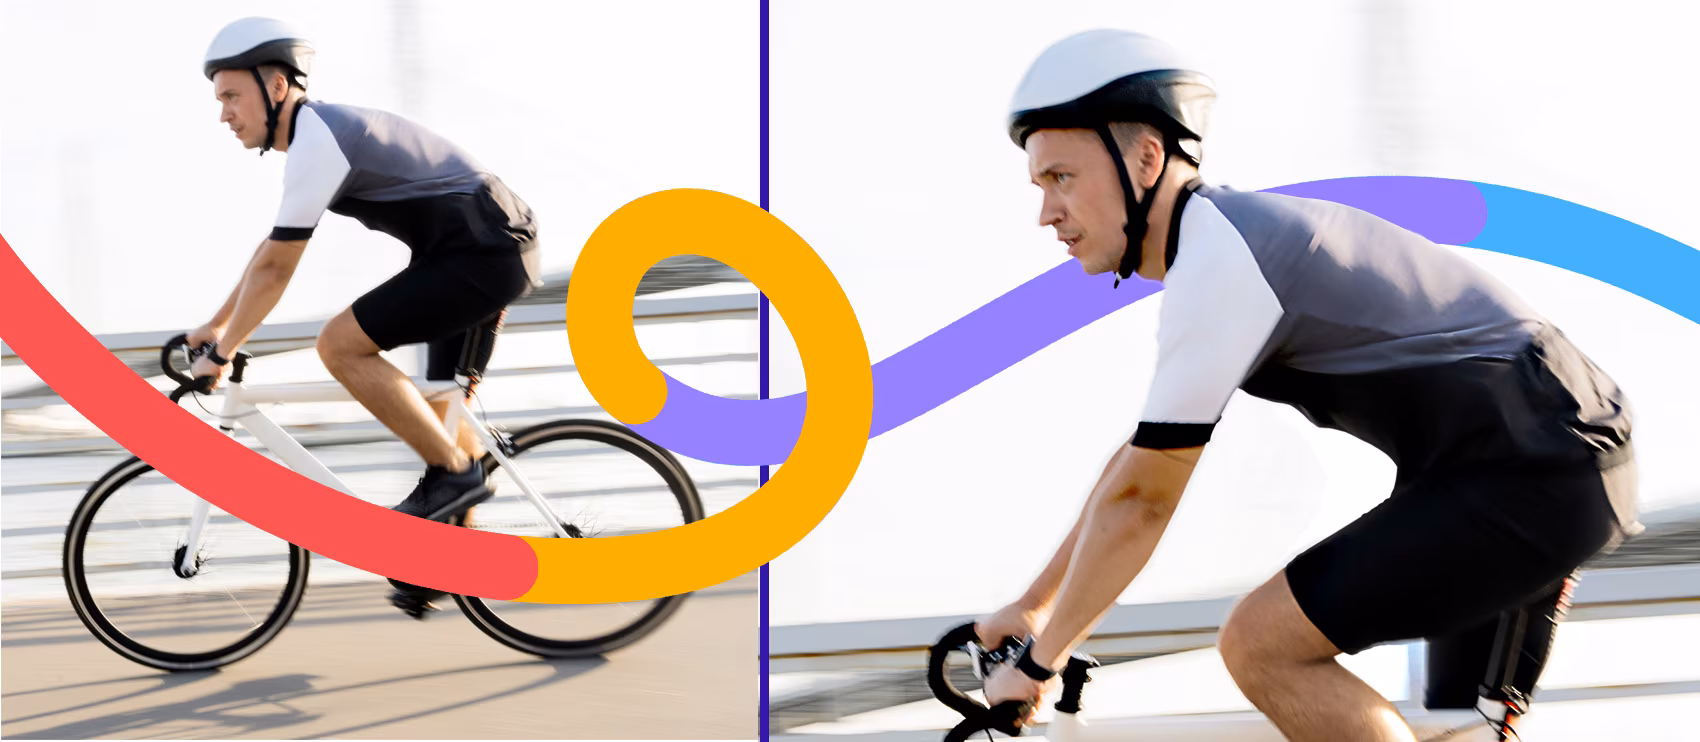
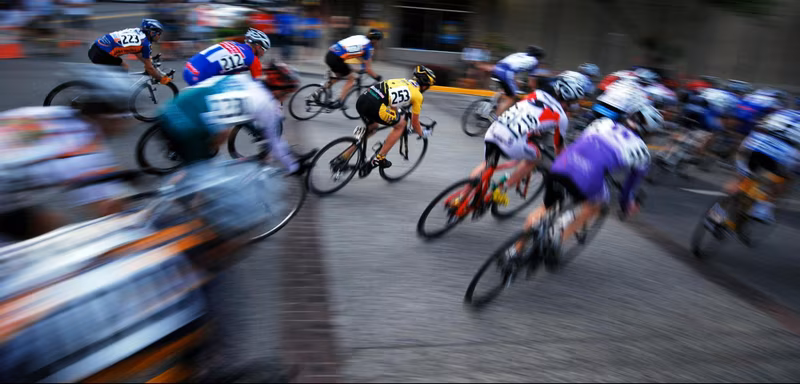
That split-second when the runner crosses the finish line. The exact moment the basketball swishes through the net. The explosive power of a tackle. You captured it all—except the image came out blurry.
If you’ve ever felt the disappointment of reviewing your sports photos only to find them out of focus, you’re not alone. Motion blur and focus issues plague even experienced photographers. The good news? Many blurry sports photos can be rescued with the right techniques, and future shots can be prevented with proper camera settings.
This guide walks you through proven methods to fix blurry sports photos using photo editing software, plus actionable tips to capture sharp action shots from the start.
How to Fix a Completely Blurry Sports Photo
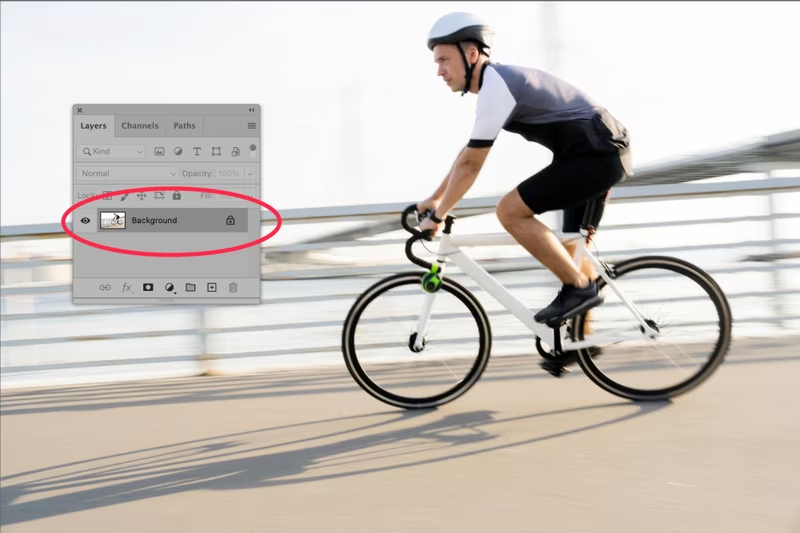
When your entire frame lacks sharpness, you’ll need to apply sharpening techniques to the full image. While no tool can truly reverse blur, these methods create the illusion of increased sharpness by enhancing edge contrast.
Using the Unsharp Mask Tool
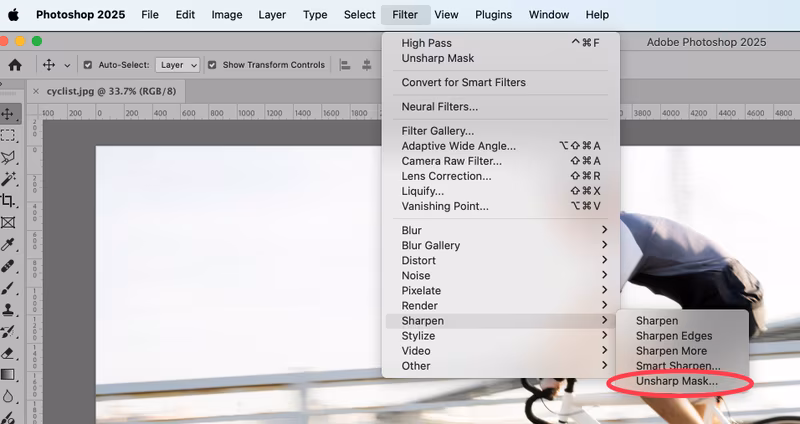
Despite its confusing name, the Unsharp Mask is one of the most effective tools for sharpening sports images. It works by identifying edges in your photo—areas where adjacent pixels differ in color—and increasing their contrast.
Open your blurry sports photo in Photoshop and select the image layer. Navigate to Filter > Sharpen > Unsharp Mask to open the adjustment dialog.
You’ll see three critical sliders:
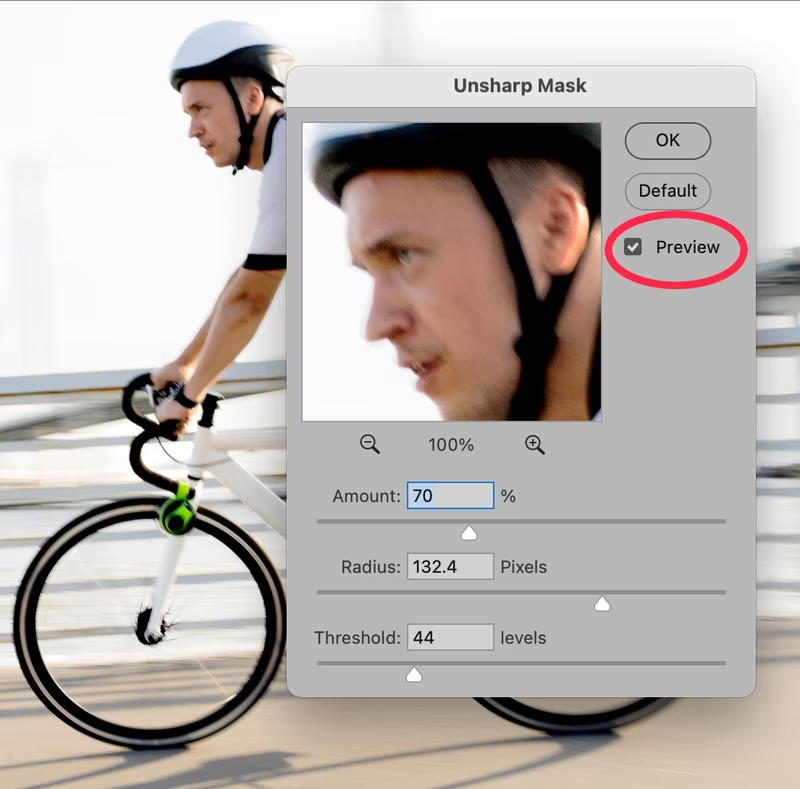
Amount controls the intensity of sharpening. Start around 100-150% for sports photos with moderate blur. Higher values increase contrast but can create harsh, unnatural edges.
Radius determines how many pixels surrounding each edge are affected. For sports photography, keep this between 1.0 and 2.0 pixels. Going higher creates obvious halos around subjects.
Threshold sets the minimum difference between pixels before they’re considered an edge. Lower values (0-5) sharpen more of the image, while higher values (10-20) limit sharpening to only the most distinct edges.
The key is balance. Oversharpening creates artifacts and makes images look processed. Start conservative, check the preview, and adjust incrementally until you achieve natural-looking sharpness.
Sharpen Blurry Sports Images Using the High Pass Filter
The High Pass Filter offers more control than Unsharp Mask and works beautifully for sports action shots with lots of detail.
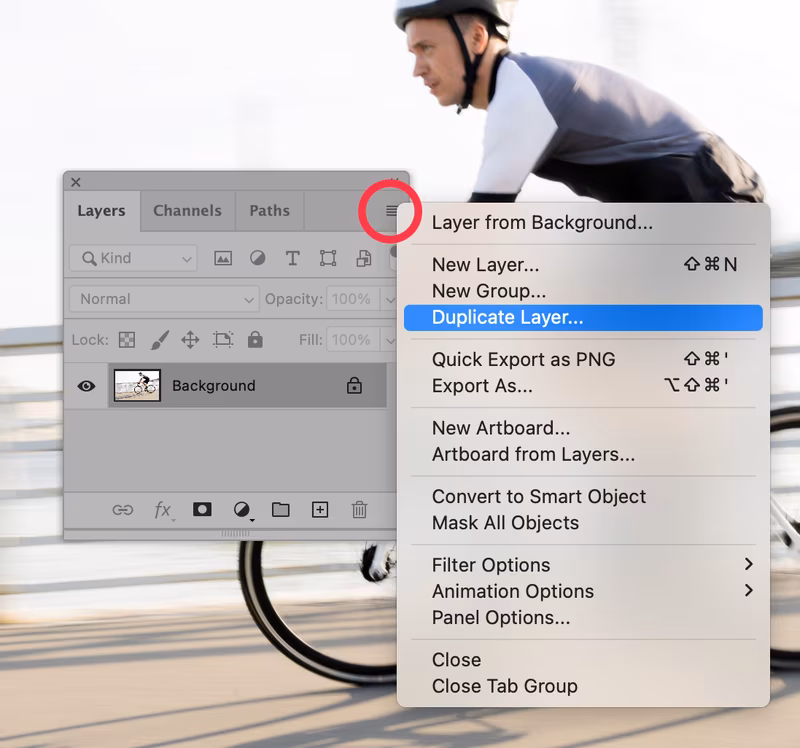
Start by duplicating your image layer. This non-destructive approach lets you adjust or remove the effect later. With the duplicate layer selected, go to Filter > Other > High Pass.
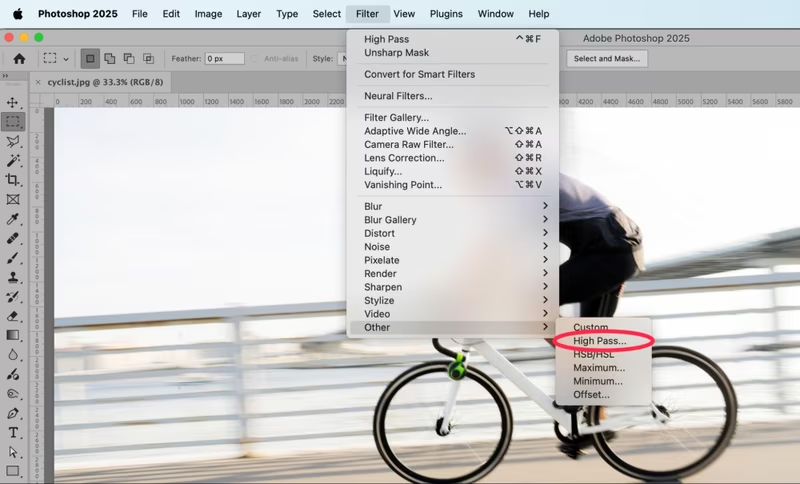
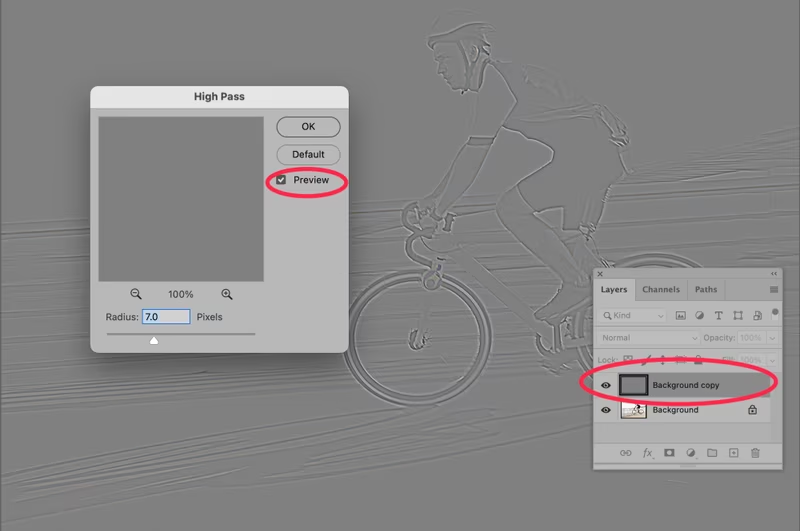
Your image will turn gray, showing only edge outlines. Adjust the Radius slider while watching the preview. For sports photos, stay between 3.0 and 7.0 pixels. Lower values create subtle sharpening, while higher values produce more dramatic effects.
Once satisfied, click OK. Change the duplicate layer’s blending mode from Normal to Overlay. Your image immediately appears sharper. For even more punch, try Soft Light mode for gentler results or Hard Light for aggressive sharpening.
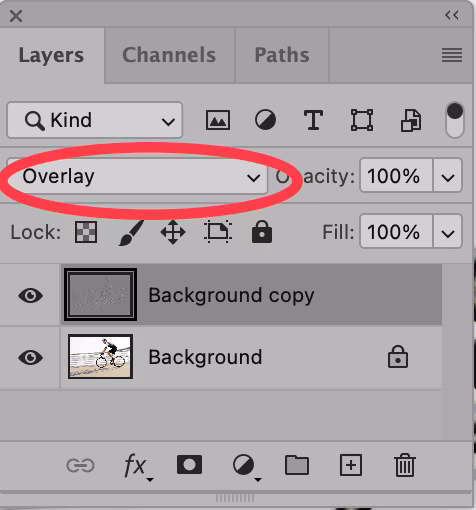
The beauty of this technique? You can reduce opacity on the sharpened layer to fine-tune the effect, or use layer masks to apply sharpening selectively.
For maximum sharpness on severely blurred images, apply Unsharp Mask first, then add a High Pass Filter layer. This combination tackles blur from multiple angles.
How to Fix a Specific Area of a Blurry Sports Photo
Sometimes you want motion blur in the background but need your subject razor-sharp. These selective sharpening techniques let you target specific areas while preserving intentional blur elsewhere.
How to Use a Selection and Layer Mask
Layer masks give you precise control over where sharpening appears. This technique is perfect when you want an athlete’s face to be sharp, but the rest is intentionally blurred.
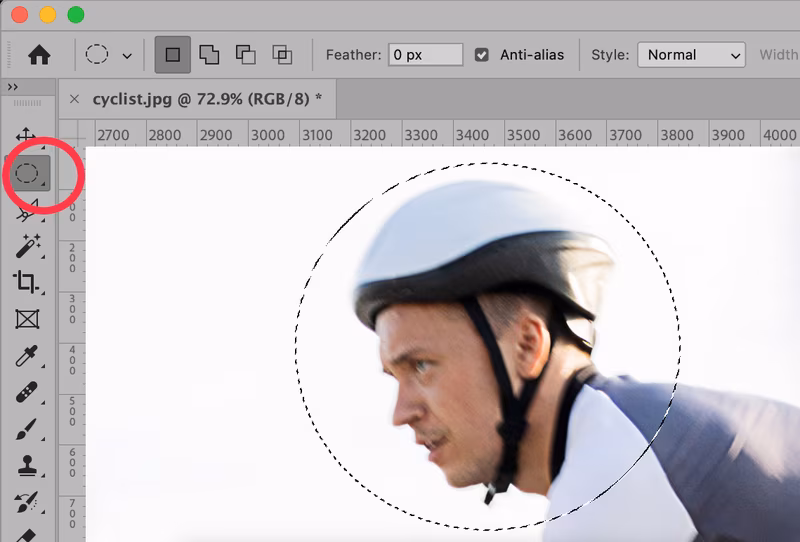
Apply a High Pass Filter to a duplicate layer as described above. Before changing the blend mode, use the Elliptical Marquee Tool or Lasso Tool to select the area you want to sharpen—typically the subject’s face or upper body.
Soften the selection edges by going to Select > Modify > Feather. Enter a value between 100-250 pixels, depending on your image size. This creates a gradual transition that looks natural.
With the selection active and your High Pass layer selected, click the Layer Mask icon at the bottom of the Layers panel. The mask automatically hides the sharpening effect everywhere except your selected area.
Change the layer blend mode to Overlay. Now the enhanced sharpness only affects your chosen region. You can paint on the mask with a soft white brush to reveal sharpening in additional areas, or use black to hide it.
How to Use the Sharpen Tool
For quick touch-ups on specific features, the Sharpen Tool offers direct control. Select it from the toolbar (it shares space with the Blur and Smudge tools).
Choose a soft-edged brush and set the Strength between 25-50% in the options bar. Too much strength creates obvious, crunchy-looking areas.
Paint directly over details you want to enhance—eyes, hands gripping equipment, facial features. Work on your original layer, not the High Pass layer, for best results.
The Sharpen Tool excels at adding definition to small areas. Use it after broader sharpening techniques to emphasize crucial details that draw the viewer’s eye.
How to Remove a Blurry Background from a Sports Photo
Sometimes the fastest way to handle a blurry background is complete removal. Replacing it with a clean backdrop or transparent background can save an otherwise unusable sports photo.
Use AI to Remove a Background in Photoshop
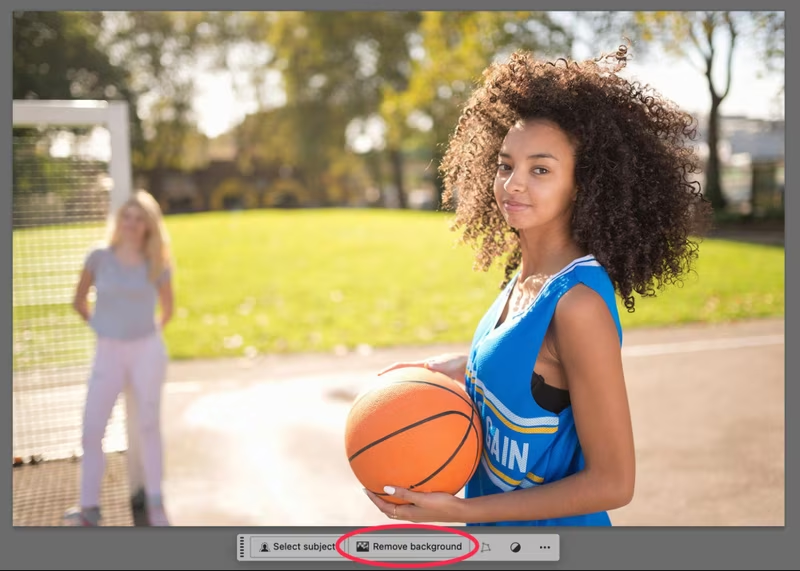
Photoshop’s AI-powered Remove Background feature offers quick results. With your image open, look for the Remove Background button in the Contextual Task Bar below your canvas.
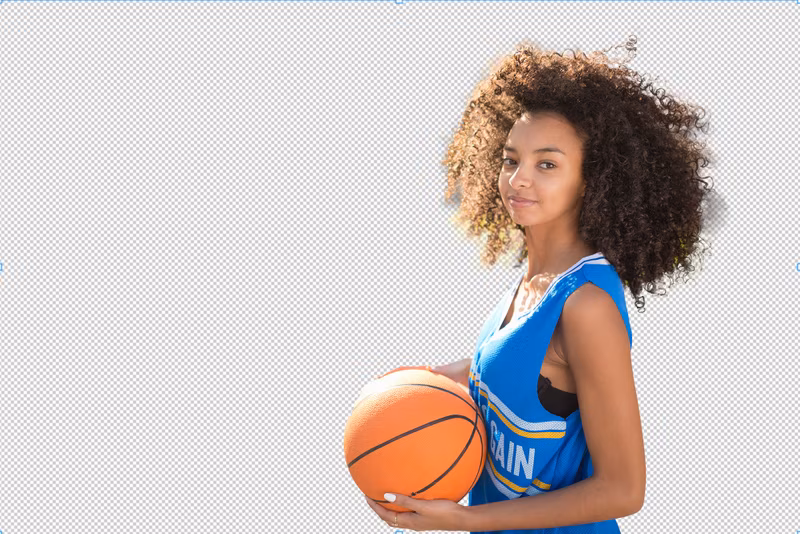
One click and the AI analyzes your image, identifying the main subject and erasing the background. For simple compositions with clear subject separation, this works remarkably well.
However, AI background removal struggles with complex edges like hair, fast-moving subjects, or low-contrast boundaries. The tool provides a starting point, but manual refinement usually follows.
Remove Background Using Select and Mask
For more control, use Photoshop’s Select and Mask workspace. Go to Select > Select and Mask to enter this specialized environment.
Click Select Subject to let Photoshop identify your athlete automatically. The AI does a decent job on well-defined subjects. Use the Refine Edge Brush to improve hair and other tricky areas.
Adjust the following settings for cleaner selections:
Smooth reduces jagged edges along the selection boundary. Values between 5-15 work well for sports subjects.
Feather softens the transition between subject and background. Keep this low (0.5-1.5 pixels) for sharp edges.
Contrast increases edge definition. Moderate values (10-25%) help separate subjects from similar-colored backgrounds.
Shift Edge moves the selection boundary inward or outward. Use negative values (-1 to 3) to slightly shrink the selection and eliminate background fringe.
Set Output To Layer Mask and click OK. Your subject now sits on a transparent background, ready for a new backdrop.
Refine Selection Using the Pen Tool
The Pen Tool delivers the most precise selections, especially for hard edges like sports equipment, uniforms, and body contours.
Select the Pen Tool and zoom in close. Click to place anchor points along your subject’s edge, creating a path that follows every curve and angle. Don’t worry about perfection on the first pass.
Once you’ve closed the path, right-click and choose Make Selection. Set Feather Radius to 0 pixels for sports photography—sharp edges look most natural.
With the selection active, click the Layer Mask icon to hide the background. Use the mask to refine as needed, painting with white or black brushes to reveal or hide areas.
Use the Background Eraser Tool
The Background Eraser Tool excels at removing backgrounds near complex areas like hair, especially when there’s good color contrast between the subject and the background.
Select the Background Eraser Tool (hold down the Eraser Tool to access it). Set a brush size appropriate for the area you’re working on.
The tool samples the color in the center of the brush and erases similar colors. Work carefully around your subject’s edges, adjusting brush size frequently. Set Tolerance between 25-30% to remove background without eating into your subject.
For hair, work in small sections. Sample frequently by clicking in different background areas to ensure you’re only removing unwanted pixels.
How to Avoid Taking Blurry Sports Photos
Prevention beats correction every time. These camera techniques help you capture sharp sports photos straight out of the camera.
Fast Shutter Speed
Shutter speed is your primary defense against motion blur. The rule is simple: faster subjects require faster shutters.
For most sports action, start at 1/1000 second. This freezes athletes running, jumping, or swinging. For extremely fast action like motorsports, hockey, or soccer players sprinting at full speed, increase to 1/2000 or 1/4000 seconds.
For slower sports or when you want some motion blur for artistic effect, you can drop to 1/500 second. Experiment during warmups or practice to find the sweet spot for your specific sport.
Modern mirrorless cameras offer electronic shutters with speeds up to 1/32,000 second, opening creative possibilities for capturing the fastest moments in sports.
Want intentional background blur with a sharp subject? Try panning. Slow your shutter to 1/125-1/250 second and smoothly follow your subject’s movement. This technique takes practice but creates dynamic images with motion-blurred backgrounds and sharp subjects.
Adjust Light
Fast shutter speeds require abundant light. When you crank up shutter speed, you’re cutting the time light has to reach your sensor, resulting in darker images unless you compensate.
Three ways to brighten your image when using fast shutters:
Open your aperture to the widest setting your lens allows (f/2.8, f/4, or f/5.6). This lets in maximum light but reduces the depth of field. That’s usually fine—selective focus draws attention to your subject.
Raise ISO to increase sensor sensitivity. Modern cameras handle high ISO remarkably well. Don’t fear ISO 3200, 6400, or even higher in low light. Some grain is better than motion blur.
Add artificial light when allowed. Flash can freeze motion beautifully, but check venue rules first. Many indoor sports ban flash for safety reasons.
Outdoor daylight sports give you the most flexibility. Overcast days provide soft, even lighting perfect for sports photography. Direct sun creates harsh shadows but offers plenty of light for fast shutters.
Reduce Camera Shake
Even with fast shutter speeds, camera shake can introduce blur. Proper technique keeps your gear stable during critical moments.
Use your camera strap as a stabilizer. Pull it taut against your neck while shooting to create a three-point support system with your hands and body.
Hold the camera firmly but not in a death grip. Tension creates shake. Keep your elbows close to your body or brace them against your torso.
Invest in optical or in-body image stabilization. Modern stabilization systems compensate for several stops of shake, letting you shoot at slower shutter speeds while maintaining sharpness.
Consider a monopod for long telephoto lenses. These support the weight of heavy glass while allowing quick movement to track action. They’re staples at professional sporting events for good reason.
Practice your shooting stance. Plant your feet shoulder-width apart, slightly bend your knees, and lean forward slightly. This stable base reduces body sway during long shooting sessions.
Let Us Fix Your Sports Photos
Fixing blurry sports photos requires time, skill, and patience. While the techniques in this guide help rescue many images, some situations demand a professional touch.
Professional photo editing services specialize in sports photography challenges. They handle background removal, selective sharpening, color correction, and complex masking that would take you hours to accomplish alone.
This lets you focus on what matters—capturing the action. Instead of spending evenings hunched over editing software, send your images to specialists who can enhance them quickly and affordably.
Professional editors typically turn around sports photo edits within 6-24 hours, giving you polished images ready for clients, social media, or portfolio use. Services often start around $0.25-0.50 per image for basic edits, making them accessible even for hobbyist photographers.
Whether you need batch processing for hundreds of game photos or careful retouching of your best action shots, professional services scale to your needs.
How to Fix Blurry Sports Photos FAQs
Can you fix blurry sports photos in Lightroom?
Yes, Lightroom offers effective sharpening tools in the Detail panel. The Sharpening slider works similarly to Photoshop’s Unsharp Mask, with Amount, Radius, and Detail controls. Hold Alt (Windows) or Option (Mac) while adjusting to see exactly what you’re sharpening. Lightroom’s Texture slider also adds mid-tone contrast that can enhance perceived sharpness in sports photos without creating halos.
What causes blurry sports photos?
Blurry sports photos result from several factors: shutter speed too slow for the action, missed focus from autofocus tracking errors, camera shake from handheld shooting with heavy lenses, and shooting in low light without proper ISO adjustment. Motion blur appears when subjects move during exposure, while camera shake creates overall image softness in all directions.
What is the best shutter speed for sports photography?
For most sports, 1/1000 second provides sharp action freezing. Extremely fast sports like motorsports, hockey, or baseball may need 1/2000-1/4000 seconds. Slower sports like golf or swimming can work at 1/500 second. If you want creative motion blur effects, drop to 1/125-1/250 seconds and pan with your subject for sharp athletes against blurred backgrounds.
How do I make my sports pictures not blurry?
Start with shutter priority or manual mode to control shutter speed. Set your shutter to 1/1000 second or faster. Use continuous autofocus mode (AI Servo for Canon, AF-C for Nikon/Sony,) so focus tracks moving subjects. Shoot in burst mode to capture multiple frames per second, increasing your odds of a perfectly sharp moment. Ensure adequate lighting through high ISO settings or by shooting outdoors in good light.
Why are my sports pictures blurry even with sports mode?
Sports mode typically selects appropriate settings, but it can’t overcome fundamental limitations. In low light, even sports mode struggles to balance fast shutter speeds with proper exposure. The camera may slow the shutter too much or the autofocus may hunt in poor lighting conditions. Sports mode also might focus on the wrong subject in crowded scenes. Switching to manual control gives you more precise adjustment.
Should I use autofocus or manual focus for sports?
Use continuous autofocus (AI Servo or AF-C) for sports photography. Modern autofocus systems track moving subjects far better than manual focusing. Set your camera to use all focus points or a zone of points covering where the action occurs. For sports with predictable movement, pre-focus on a spot where action will happen, then switch to manual to lock that focus.
What’s the difference between motion blur and out-of-focus blur?
Motion blur creates directional streaking when subjects or cameras move during exposure. It appears along the direction of movement. Out-of-focus blur makes the entire image or specific areas appear soft without direction. Motion blur fixes with faster shutter speeds, while focus blur requires better focusing technique or stopping down your aperture for greater depth of field.
Can AI completely unblur a sports photo?
AI tools show impressive results for minor blur, but they can’t truly recover details that weren’t captured. Think of AI as an intelligent guess at what sharp details might look like, not actual detail recovery. For severely blurred images where motion blur exceeds several pixels, even the best AI will produce soft, artificial-looking results. AI works best as a starting point combined with manual refinement techniques.