How to Remove Objects in Real Estate Photos: Complete Guide
Picture this: You’ve captured the perfect shot of a stunning property, but there’s a bright orange traffic cone in the pristine driveway. Or personal items clutter an otherwise gorgeous living room. These visual distractions can make or break a potential buyer’s first impression. To catch the buyer’s attention, we need clear and attractive photos. To do that, there is no other way but to learn how to remove objects in real Estate photos.
Statistics show that over 61.3% of brokers consider professional images essential for selling a property, yet only 15% of agents make use of them. Stand out from the crowd by learning how to upgrade your real estate photo game!
In today’s competitive real estate market, professional-quality images are essential for attracting buyers and securing quick sales. Removing objects from real estate images has become a crucial skill for agents, photographers, and property marketers who want their listings to stand out from the thousands of others online.
This comprehensive removal guide will help you learn how to remove Objects in real estate photos and make your online presence more effective.
What Object Removal Means in Real Estate Photos and Why It Matters

Real estate photo editing requires precision tools and professional techniques for seamless object removal
Object removal refers to the digital elimination of distracting items from listing images through sophisticated photo editing techniques. This process involves carefully selecting unwanted elements and seamlessly replacing them with appropriate background content, creating clean, professional images that showcase properties at their absolute best.
The practice delivers 7 key benefits that directly impact listing success:
1. First Impressions Matter
- Nowadays 90% of house buyers are searching on the internet for their home search process.
- Homes with professional photos can grab up to 118% more views online, and more clicks mean more chances to sell fast!
2. Higher Perceived Value
- Houses with high-quality images sell 32% faster.
- Houses with Impressive images get 61% more views.
3. Greater Online Reach
- Posts on Facebook that include pictures get over 2 times as much attention as those without. Since social sites help a lot in selling homes, this matters.
4. Consistency Across Listings
- Keeping your brand steady, including having photos that always look good, can help boost sales by 23%.
5. Virtual Tours and Advanced Technology
- Homes that offer a virtual walkthrough get 87% more attention than those that don’t.
- The number of adult internet users, which is 50% depends on decision-making and the virtual research process.
6. Enhanced Focus on Property Features
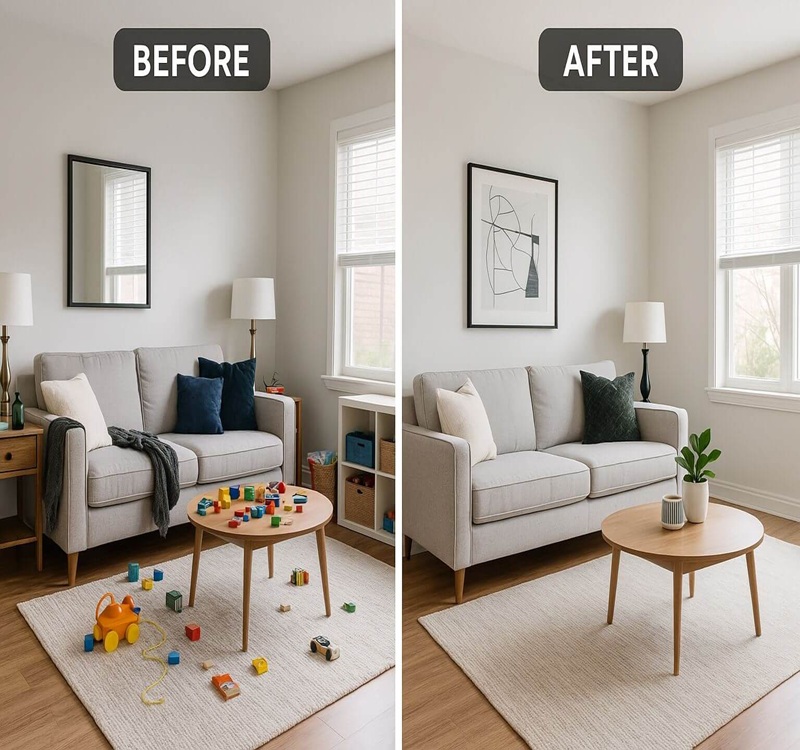
Removing clutter, personal belongings, and temporary distractions allows buyers to appreciate the home’s layout, architectural details, and natural lighting. Clean images let the property’s best features shine without competing for attention.
7. Positive Emotional Response
Studies show buyers make emotional decisions within seconds of viewing property photos. Clutter-free, well-organized spaces create feelings of calm and possibility, helping buyers envision themselves living in the home. This emotional connection often translates into increased showing requests and faster sales.
When to Remove Objects and When to Leave Them

Strategic object removal focuses on temporary clutter while preserving permanent property features
When Should You Remove Distractions from Real Estate Photos?
Certain elements consistently detract from a property’s appeal and should be digitally removed:
Temporary Clutter: Trash cans, recycling bins, construction materials, yard debris, and seasonal items create negative impressions and make properties appear neglected.
Personal Belongings: Family photos, children’s toys, pet accessories, and personal hygiene items can alienate potential buyers or create privacy concerns.
Visual Distractions: Vehicles in driveways (unless luxury cars add value), bicycles, lawn equipment, extension cords, and people in shots detract from the property focus.
Minor Imperfections: Small wall cracks, scuff marks, peeling paint edges, and carpet stains can be addressed if they don’t misrepresent the property’s condition.
When Should You Preserve Features to Maintain Credibility?
Not everything should be removed. Maintaining authenticity requires preserving certain elements:
Permanent Structural Features: Never remove buildings, mature trees, built-in appliances, or architectural elements that buyers will encounter during visits.
Property Characteristics: Preserve boundary markers, utility infrastructure, permanent signage, and natural features like slopes or drainage that affect property value or buyer decisions.
Legal Boundaries: Over-editing can mislead buyers and reduce trust. The key is balancing the best presentation with an honest representation of what buyers will experience.
Challenges in Item Removal and Effective Solutions

Common editing artifacts require professional techniques to achieve seamless, undetectable object removal
Artifact Appearance and How to Fix It
Visible marks or remnants left by editing tools can make photos look manipulated. Common issues include blurry patches, color inconsistencies, unnatural texture patterns, and sharp edges that don’t blend naturally.
Solutions: Use healing tools like the Spot Healing Brush to refine rough edits. Test images on multiple devices and zoom levels before finalizing. Apply subtle noise to match the original photo texture. Work with multiple layers to maintain editing flexibility.
Maintaining Texture and Color Consistency
Best Practices: Sample source material from areas with similar lighting conditions. Use the Clone Stamp tool with low opacity (30-50%) for gradual, natural blending. Match ambient lighting conditions across edited areas. Blend backgrounds smoothly using feathered selections and layer masks.
Precision Editing and Layer Management
Always zoom to 100% magnification for precise selections. Use feathered edges on selection tools for natural transitions. Employ layer masks for non-destructive editing. Organize layers with descriptive names like “Car Removal – Driveway” and group related edits into folders.
Preventing Over-Editing: Step back regularly to assess overall balance. Keep original files for comparison. Leave appropriate staging items that add warmth. Maintain natural imperfections that don’t significantly detract from appeal.
Strategic Object Removal – What to Remove & What to Keep
Evaluating Each Item by Viewer Appeal
Ask yourself: Does this item add to or detract from the listing’s attractiveness?
Remove: Mismatched décor, personal collections, excessive furniture, and bright, distracting colors that draw attention from architectural features.
Keep: Fresh flowers suggesting good maintenance, high-quality furniture helping buyers envision room usage, tasteful décor creating welcoming atmospheres, and modern appliances highlighting updates.
Tailoring Edits to Market Expectations
Luxury Markets: Demand meticulous attention to detail. Even minor imperfections can signal poor maintenance to high-end buyers.
Family Properties: Some family-oriented amenities might attract target demographics, but remove personal clutter to maintain broad appeal.
Urban vs. Suburban: City properties might benefit from showing neighborhood vibrancy, while suburban listings focus on private, serene environments.
Benefits of a “White Canvas” Approach
The minimalist approach allows buyers to imagine themselves in the space without existing décor influencing decisions.
Key Advantages:
- Clearer Architectural Details: Buyers better appreciate crown molding, built-ins, and value-adding elements
- Enhanced Floor Layouts: Open spaces help buyers understand traffic flow and visualize their furniture
- Improved Listing Visibility: Clean images stand out in crowded online marketplaces
- Broader Appeal: Neutral spaces appeal to diverse buyer preferences
Real estate professionals report properties using this approach spend 23% less time on the market compared to cluttered listings.
Step-by-Step Guide to Remove Objects in Real Estate Photos

Step-by-step object removal process using professional photo editing tools and techniques
Photoshop Techniques
Selection Tools
Lasso Tools: Regular Lasso for organic shapes, Polygonal Lasso for straight edges, Magnetic Lasso for high-contrast objects. Always leave a small buffer zone when selecting to avoid cutting into background elements.
Clone Stamp Tool
Set brush hardness to 0% and opacity to 50-70%. Alt-click to sample clean areas, then apply short overlapping strokes. Frequently resample from different areas to avoid repetitive patterns. Work from the outside edges toward the center.
Healing Tools
Spot Healing: Perfect for small imperfections. Simply paint over problem areas for automatic blending. Healing Brush: Offers more control for larger areas with manual sampling point selection.
Content-Aware Fill
- Select the unwanted object with any selection tool
- Choose Edit > Content-Aware Fill
- Adjust the sampling area in the workspace to exclude unwanted elements
- Fine-tune Color and Rotation Adaptation settings
- Apply changes
AI-Powered Alternatives
BeFunky Object Eraser Workflow:
- Upload an image to the platform
- Select the Object Eraser tool
- Adjust the brush size and paint over the object
- Preview generative fill result
- Apply changes and export
Advantages: No technical expertise required, fast processing for simple removals, and cost-effective for occasional use.
Limitations: Less control over blending, may struggle with complex backgrounds.
Sample Project: Removing a Car from Driveway
- Preparation: Duplicate background layer, create “Car Removal” layer group, zoom to 50%
- Selection: Use Polygonal Lasso around the car, including the shadow, feather by 2-3 pixels
- Content-Aware Fill: Apply initial fill, assess results
- Manual Refinement: Use Clone Stamp for driveway texture reconstruction
- Lighting Adjustment: Create a new layer for subtle shadow work with a soft brush at 15-20% opacity
- Final Details: Add matching noise/grain, review at 100% magnification
Recommended Tools for Object Removal

Comprehensive comparison of real estate photo editing tools from mobile apps to professional software
Entry-Level Tools
| Tool | Platform | Price | Best For |
| Snapseed | Mobile | Free | Basic cleanup, small objects |
| TouchRetouch | Mobile | $2-4 | Specialized removal |
| CleanUP Pictures | Web | Free | Quick online edits |
| BeFunky Object Eraser | Web | Freemium | User-friendly AI removal |
Professional Tools
Adobe Photoshop: Industry standard with Spot Healing, Clone Stamp, Content-Aware Fill, layer masks, and batch processing.
Specialized Platforms:
- HomeDesign AI: Automated batch processing, virtual decluttering presets, MLS integration
- Pedra AI: Advanced AI editing, automated object recognition, quality control systems
Cross-Industry Techniques: Learning from Product Photography
Fashion and product photography, particularly underwear editing, has developed precise selection and masking techniques that translate perfectly to real estate.
Shared Skills:
- Path Accuracy: Pixel-perfect selections around complex shapes
- Advanced Masking: Maintaining natural shadows and highlights
- Edge Refinement: Creating natural blending without artificial cuts
- Color Matching: Sophisticated color theory for seamless texture matching
Many successful real estate editors have product photography backgrounds because these skills produce superior results requiring exceptional attention to detail.
Batch Processing for Multiple Properties
Efficiency Strategies:
Pre-Assessment: Catalog all objects needing removal, identify recurring elements, and group by complexity level.
Template Workflows: Create Photoshop actions for “Standard Driveway Cleanup,” “Interior Declutter,” and “Exterior Maintenance.”
File Organization: Use systematic naming like “PropertyAddress_Room_EditType_Version” with separate folders for originals and completed edits.
Cost Management: Prioritize based on image importance, use AI tools for initial cleanup, and reserve manual editing for high-priority images.
These approaches can reduce editing time by 60-70% while maintaining consistent quality across property portfolios.
Best Practices and Final Recommendations

Professional object removal techniques deliver results that impress clients and accelerate property sales
Skill Development: Start with simple removals and gradually tackle complex challenges. Each project builds technical confidence and market understanding.
Market Alignment: Research local standards and buyer expectations. Luxury markets demand perfection; family markets might appreciate some warmth and character.
Technology Integration: Use AI tools for bulk work, but verify results. Professional services can deliver results in 12-24 hours for demanding schedules.
File Management: Archive original files separately, maintain multiple export formats, and keep detailed editing notes for future reference.
The industry continues evolving with new AI tools and techniques. Stay current with industry publications and continuing education to maintain competitive advantages.
FAQs on How To Remove Objects in Real Estate Photos
Is removing yard debris deceptive or misleading?
Removing temporary debris like leaves or construction materials is acceptable since these don’t represent permanent features. However, avoid removing mature landscaping or permanent structures. The key distinction is between temporary clutter and permanent property characteristics that buyers will encounter during visits.
Can I apply one edit across multiple listing images?
Use similar techniques across images, but avoid copying exact edits without considering each photo’s unique lighting and angles. Create Photoshop actions for common corrections, but complex removals require custom work for professional quality.
How do product photography techniques apply to real estate editing?
Fashion editing requires precision selections, natural shadow preservation, and seamless color matching. These skills directly apply to removing furniture and objects while maintaining realistic lighting patterns. Many successful real estate editors have product photography backgrounds because the attention to detail exceeds typical editing standards.
Real Estate Success with Professional Photo Editing
The difference between a listing that sits on the market for months and one that sells within days often comes down to one crucial factor: the quality of the first impression. In today’s digital-first real estate landscape, that first impression happens through your property photos, and mastering how to remove objects in real estate photos can be the game-changer that sets your listings apart.
We’ve explored everything from basic Photoshop techniques to advanced AI-powered solutions, but the real magic happens when you combine technical skills with strategic thinking about buyer psychology. Every removed piece of clutter isn’t just about prettier pictures—it’s about removing barriers between potential buyers and their dream home.
Ready to transform your real estate listings? Start practicing these techniques on less critical images, then apply them to important property photos. The goal is to create images that help buyers fall in love with properties. Master how to remove objects in real estate photos and watch your listings generate more interest, faster sales, and happier clients.
If you want to outsource the services online, PixcRetouch is one of the best and efficient online service providers. Let’s connect and make your real Estate business bigger with our Real estate service.