

In real estate photography, the sky sets the mood and can make or break a buyer’s first click. That’s where learning how to replace skies in real estate photos comes into play. This technique transforms dull outdoor shots into vibrant, market-ready images that boost engagement and speed up sales.
As someone who’s worked with countless real estate photographers and agents over the years, I’ve seen firsthand how sky replacement in real estate photography elevates listings. It aligns with what buyers crave: bright, inviting visuals that evoke emotion and trust. Whether you’re a photographer fixing overcast days or an agent polishing MLS uploads, this guide covers everything from basics to advanced tweaks. We’ll dive into why it matters, common pitfalls, step-by-step methods, and pro tips for natural results. By the end, you’ll have the tools to handle real estate photo sky editing like a pro.
Why Replacing the Sky Improves Real Estate Photos and Helps Listings Perform Better

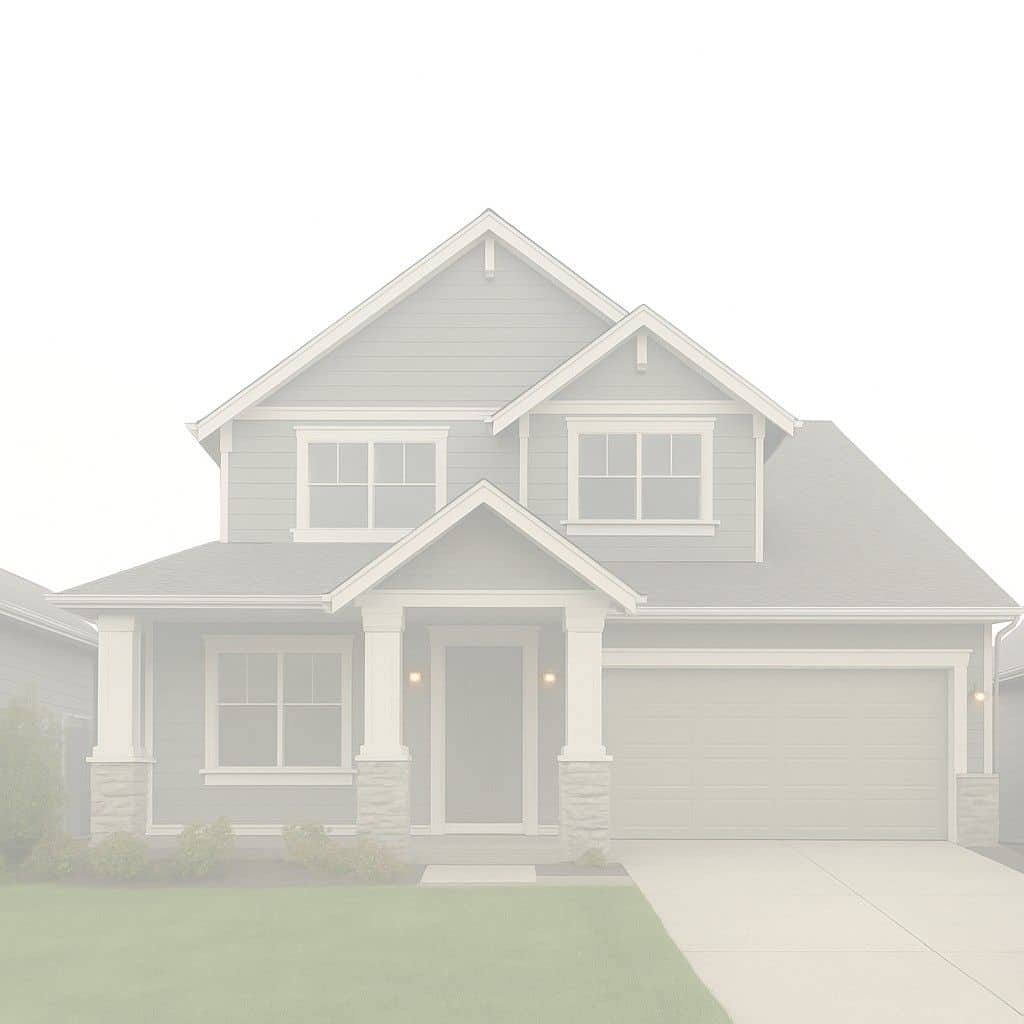
Before and After: Sky Replacement in Real Estate Photography Boosts Visual Appeal and Buyer Interest
Swapping out a lackluster sky for a more appealing one isn’t just cosmetic—it’s a strategic move that enhances the overall vibe of property images. High-quality visuals with clear skies can significantly increase inquiries and speed up sales.
How a clear sky boosts outdoor real estate photo editing results and improves first impressions
A vibrant sky adds depth and contrast, making the property stand out more sharply and clearly. In outdoor real estate photo editing, this creates a polished look that grabs attention instantly. Replacing a flat gray expanse with blue skies highlights architectural details and landscaping, leading to stronger first impressions. Buyers often decide in seconds based on photos, so that this simple tweak can mean the difference between a scroll-past and a scheduled viewing.
Why buyers react better to bright, clean skies in property listings
Bright skies evoke positivity and openness, making properties feel welcoming. Listings with enhanced skies see higher click-through rates because they align with buyers’ ideal visions of homeownership. Clean skies reduce distractions, letting the home itself take center stage and creating an emotional pull that translates to faster offers.
When a sky replacement is needed, and when you should avoid it
Use sky replacement when dealing with overcast, blown-out, or heavily cloudy conditions that dull the entire image—especially common on shoot days with bad weather. Avoid it when the original sky already complements the property naturally (e.g., a dramatic stormy sky on a coastal home) or when the photo was taken during golden hour with perfect natural light. Over-editing can erode buyer trust if it looks fake, so always prioritize authenticity.
Common Sky Problems in Real Estate Photography That Hurt Listing Appeal
Blown-Out and Dull Skies: Common Issues in Real Estate Photos That Reduce Listing Appeal
Sky flaws can sabotage even the best-composed shots, making beautiful homes look flat and uninviting.
Blown-out skies, dull skies, and real estate HDR sky issues
Blown-out (completely white) skies from overexposure, dull gray skies from cloudy weather, and patchy HDR merges are the most frequent culprits. They kill contrast and make the entire image feel lifeless.
Color mismatch between the original sky and the property foreground
A cold gray sky clashing with warm brick or siding creates visual discord that immediately feels “off” to viewers, even if they can’t pinpoint why.
Issues with shadows, reflections, or haze that make the image look flat
Misaligned shadows, hazy atmospheric conditions, and window reflections showing a dull sky all drain energy from the photo and reduce perceived value.
The Three Main Methods to Replace Skies in Real Estate Photos (Simple to Advanced)
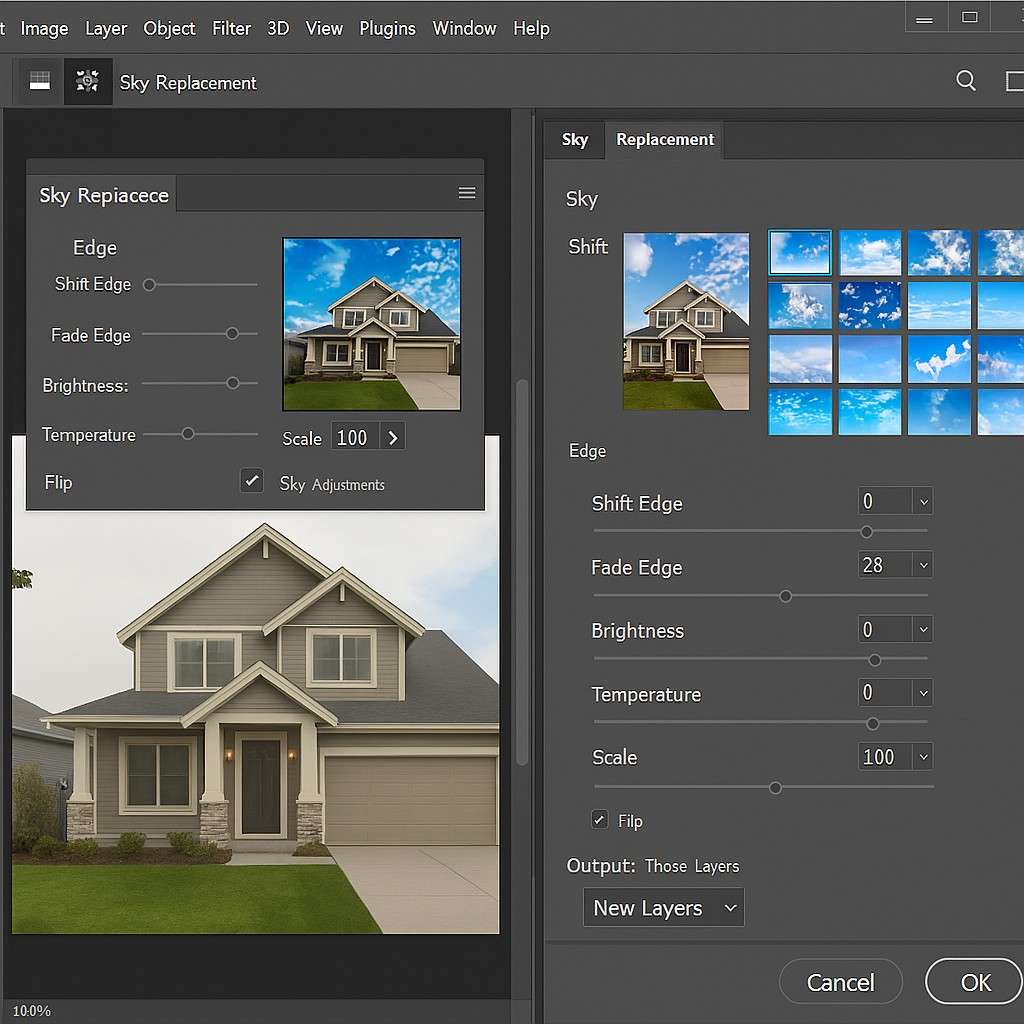
Step-by-Step Sky Replacement in Photoshop for Real Estate Photo Enhancement
Method 1: Using Automated AI Tools for Fast Sky Replacement
Perfect for beginners and high-volume shooters who need speed.
How automated sky replacement tools detect and swap the sky in seconds
Modern AI instantly segments the sky area and replaces it with a preset library, automatically adjusting perspective and basic lighting.
Steps
- Upload photo
- Choose sky preset (blue, sunset, cloudy bright, etc.)
- Adjust brightness, warmth, and saturation sliders
- Download the final image.
Pros
Very fast (seconds per image), beginner-friendly, excellent for basic outdoor real estate photo editing and batch processing.
Cons
Limited fine control; often struggles with complex edges like tree branches, roof lines, antennas, or power lines.
Method 2: Using Professional Editing Software Like Photoshop or Luminar
The go-to choice for photographers who want full control.
How Photoshop’s Sky Replacement feature works inside real estate photo enhancement
It uses AI to detect the sky, then lets you pick from Adobe’s library or your own skies, with advanced mask refinement and lighting adjustments.
Steps
- Open image in Photoshop
- Edit → Sky Replacement
- Choose sky
- Adjust temperature, exposure, and edge shift
- Refine mask with brush tools
- Output and save
Why does this method give better results for day-to-dusk sky editing and landscape sky enhancement
You can precisely control light direction, color temperature, and edge blending—critical for believable twilight conversions.
Pros
Maximum precision and natural-looking results, even on complex scenes.
Cons
Steeper learning curve and more time per image.
Method 3: Outsourcing to a Professional Real Estate Photo Editing Service
Best for agents and high-volume photographers who want consistent pro results without doing the work themselves.
How professionals create natural sky replacements with proper lighting and color correction
Experienced editors manually refine masks, match lighting direction, correct reflections, and perform full color grading for seamless results.
Steps
- Upload images to the service
- Specify preferences (blue sky, sunset, twilight, etc.)
- Receive edited files ready for MLS or website use (usually within 24 hours)
Pros
Consistent high quality, saves massive time, perfect for large batches.
Cons
Cost per image or subscription fee.
| Method | Time Required | Skill Level | Best For | Cost |
| AI Tools | Seconds | Beginner | Quick fixes & batches | Free–Low |
| Photoshop / Luminar | Minutes | Intermediate | Precision & complex scenes | Subscription |
| Outsourcing | Hours–1 day | None | Volume & consistency | Per image |
Best Practices for Realistic and Market-Ready Sky Replacement Results
Match the lighting direction and color temperature of the sky with the property
If shadows fall from left to right, choose a sky where the light source matches.
Keep skies natural to increase buyer trust and avoid unrealistic effects
Avoid cartoonish, ultra-dramatic skies unless the listing specifically calls for high-drama marketing.
Refine edges carefully for trees, rooflines, antennas, and light poles
Spend the extra minute brushing masks—halos and cut-off branches destroy credibility.
Address window reflections to match the new sky for a believable finish
Even a quick clone or content-aware fill on Windows goes a long way.
Maintain accurate colors through real estate color correction and sky fix techniques
Always finish with overall color grading so the house doesn’t look oddly warm or cool compared to the new sky.
Day-to-Dusk and Twilight Conversion Tips for Higher Listing Impact

Day-to-Dusk Twilight Conversion: Elevate Real Estate Listings with Dramatic Sky Editing
How twilight conversion real estate edits increase emotional appeal
Twilight photos create warmth and aspiration—listings with dusk exteriors routinely get more saves and inquiries.
Lighting and color steps to turn a daytime photo into a dusk scene without looking fake
- Replace sky with a twilight preset
- Lower overall exposure
- Add a warm glow to windows
- Cool down shadows slightly
- Add subtle light spill from interior onto porch/driveway
- Lightly vignette corners
FAQs
What is sky replacement in real estate photography?
The process of digitally swapping a dull or overcast sky with a clear, bright, or dramatic one to improve visual appeal.
How to replace skies in real estate photos in Photoshop?
Edit → Sky Replacement → choose sky → adjust sliders → refine edges → save.
Best software for sky replacement in real estate images?
Photoshop (most control), Luminar Neo (best AI), or dedicated real estate tools like BoxBrownie and PhotoUp.
How to fix dull skies in property photos?
Use any of the three methods above—AI for speed, Photoshop for control, or outsource for perfection.
When should I outsource real estate sky replacement?
When shooting 20+ properties per month, or when you simply don’t want to edit yourself.
How to add blue sky in real estate pictures?
Select a bright blue sky preset that matches the shooting time of day and refine edges around foliage and architecture.
Conclusion
Learning how to replace skies in real estate photos is one of the highest-ROI skills (or investments) you can make in property marketing. A single well-executed sky swap can turn a mediocre listing into a standout, driving more clicks, showings, and faster sales.
Start practicing today with free trials of AI tools, invest time in Photoshop, or partner with a professional editing service—your listings (and your closing rate) will thank you. Happy editing!