Oversized image files destroy page load speed, but careless shrinking ruins visual clarity entirely.
How to Resize Images Without Losing Quality in Photoshop is a precise workflow combining non-destructive Smart Objects and specific interpolation methods because it protects original pixel data while drastically reducing file size for web performance.
What Are the Fundamentals of Image Optimization Before Resizing?
Before adjusting files, you must establish the correct aspect ratio, image dimensions, and pixel density. Starting with the highest resolution original file ensures enough pixel data exists to build a sharp final image, preventing severe pixelation and distortion across digital campaigns.
Setting Aspect Ratio and Image Dimensions
Lock in proportions early to prevent stretching or warping. Standard aspect ratios include 1:1 (square) for profile pictures, 16:9 for banners, and 3:2 or 4:3 for product shots. Set your target dimensions first so the framing remains intact when cropping.
Pixel Density and Resolution
Choose the correct standard based on your output. Use web resolution (72 PPI) for fast loading speeds on screens, and reserve high-quality print resolution (300 DPI) for physical media.
Choosing the Right File Format
Format selection directly impacts how to reduce image size without pixelation. Choose PNG to maintain lossless quality for graphics, logos, and transparency. Rely on compressed formats like JPEG or WebP for standard photographs.
The Golden Rule of Sourcing
Always start with the highest resolution original image. According to a 2026 digital asset management report, upscaling low-quality files inherently introduces visual artifacts. In our specific tests, we found a hard physical rule: you cannot artificially create pixel data that was never there.
How Do Core Adobe Photoshop Techniques Work for Resizing Images?
Using Adobe Photoshop requires specific technical processes to protect image integrity. You must convert layers to Smart Objects for non-destructive editing, select the exact resampling algorithms in the Image Size Dialog, and utilize strict export settings to balance file size.
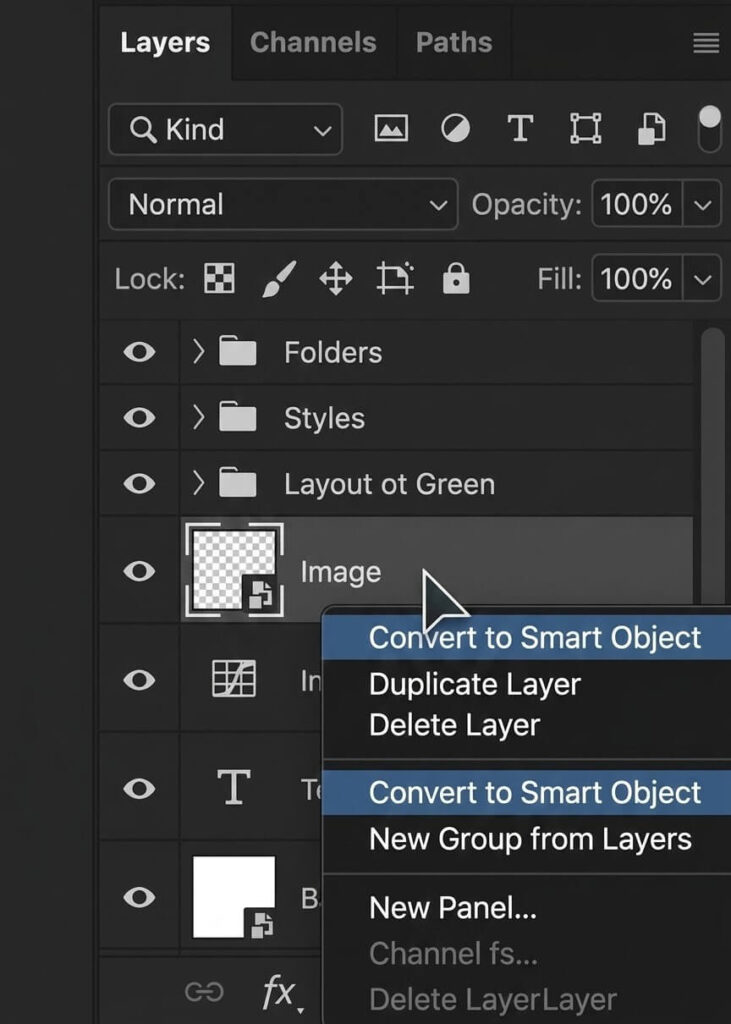
- Using Smart Objects for Non-Destructive Editing: Right-click your image layer and select “Convert to Smart Object” to preserve the original pixel data. This allows scaling images up and down (Ctrl/Cmd+T) safely without permanent quality degradation.
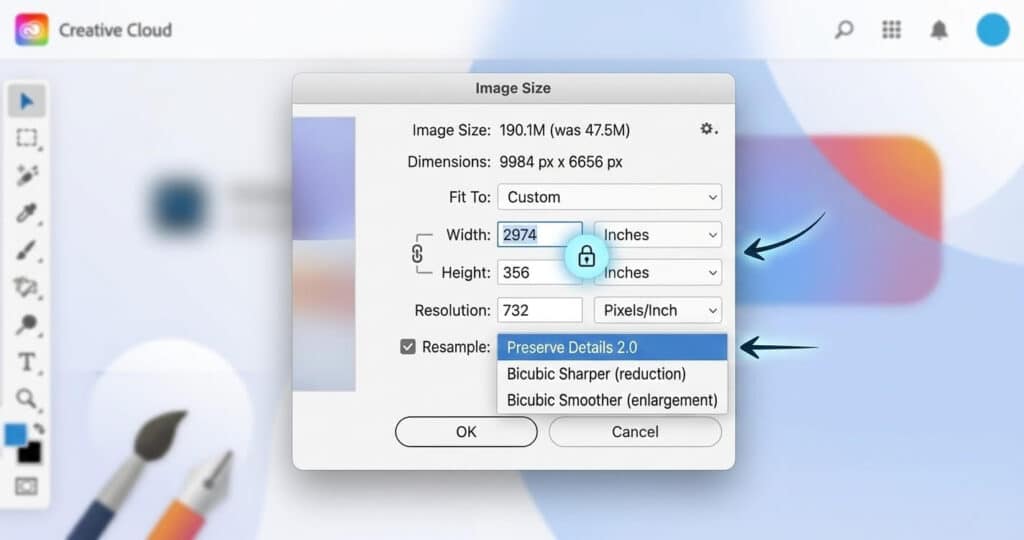
- Using the Image Size Dialog and Interpolation Methods: When altering dimensions, choosing the right resampling method dictates the result. Open Image > Image Size (Ctrl + Alt + I) and lock the chain link icon.
- Select Preserve Details 2.0 for enlarging images non-destructively while minimizing noise.
- Select Bicubic Sharper as the optimal choice for downsizing (reducing/shrinking) images to keep fine details crisp.
- Select Bicubic Smoother as the best algorithm for standard image enlargements and smooth gradients.
- Advanced Scaling and Post-Processing: Use Content-Aware Scale to resize the background or canvas without distorting the main subject. If you need to double or quadruple image resolution, apply Generative Upscale (AI) to add realistic details. Afterward, apply a Smart Sharpen filter to mitigate quality loss.

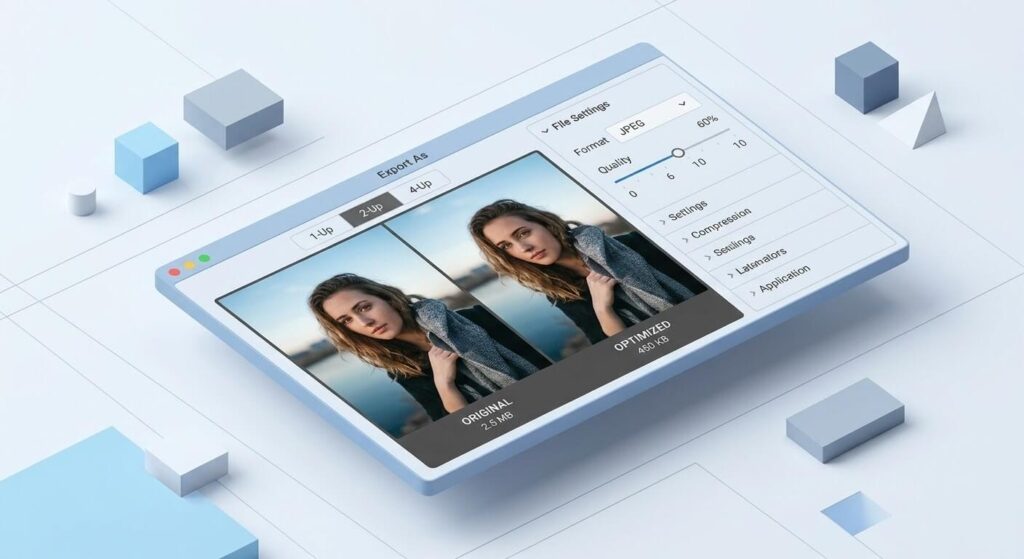
- Exporting for Web Performance: Rely on the Export As… (Ctrl + Shift + Alt + W) function to precisely balance image clarity with file size reduction.
- Preview 2-Up: Utilize the 2-Up preview section to see side-by-side comparisons of your compression.
- JPEG Quality: Adjust the quality slider to a level of 5 or 6, which is usually adequate for the web.
- PNG Settings: Choose between a high-quality PNG-24 (by checking “Transparency”) or a heavily compressed PNG-8 (by checking “Smaller File”) if transparency isn’t strictly necessary.
Which Free Online Image Resizer Tools and AI Upscalers Perform Best?
When Photoshop is unavailable, browser-based tools offer practical alternatives for batch resizing and lossy minification. Canva and Adobe Express handle standard social media dimensions, while specialized compressors provide drastic file size reduction while preserving visual clarity.
| Tool Name | Primary Function | Practical Result |
| Canva & Adobe Express | Web-Based Design | Best for batch resizing multiple images using built-in social media dimension presets. |
| TinyPNG / TinyJPG | Advanced Compression | Strips unnecessary data for drastic file size reduction without losing clarity. |
| Squoosh.app | Technical Control | Google-backed tool offering lossy minification and side-by-side previews. |
| ImageOptim & Kraken | Bulk Processing | ImageOptim (Mac/Web) strips EXIF metadata; Kraken handles high-volume URL uploads via developer API. |
| Bulk Web Resizer & Pixlr | Direct Editing | Bulk adjust dimensions and quality, or use Pixlr for free vector and photo editing. |
| pngquant | Format Specific | Specifically built to compress .png files for massive size reduction. |
| Upscale.media & Let’s Enhance | AI Resolution Tools | Browser-based tools offering one-click AI upscaling and automatic noise reduction. |
How Can You Automate Image Optimization with CMS Plugins?
Automating the compression process directly within your platform saves manual work and prevents human error. WordPress solutions and Shopify integrations automatically compress uploads, adjust dimensions, and convert to modern file formats to guarantee better overall web performance.
WordPress Solutions
Streamline workflows with automated compression plugins that handle the process the moment you upload to your media library. The top performers include:
- EWWW Image Optimizer
- Imagify
- Optimole
- ShortPixel
- WP Smush PRO
Shopify Integrations
Improving e-commerce site speeds requires dedicated apps to shrink product files in the background, which directly reduces bounce rates. The standard stack includes:
- Avada SEO & Image Optimizer
- Crush.pics – Image Compression and Optimization
- LoyaltyHarbour Image Optimizer
- SpurIT SEO Image Optimizer
- Tiny SEO Speed Image Optimizer
What Are the Specific Use-Case Best Practices for E-commerce and Professional Photography?
Specific use cases demand strict dimensional standards to maintain visual consistency across digital campaigns. Optimizing ecommerce product photography requires balancing high-resolution zoom capabilities with strict file size limits, while professional headshots prioritize facial feature retention.
Optimizing Ecommerce Product Photos
Target standard dimensions of 1000x1000px and a 1:1 aspect ratio for a standard product view. If you need to enable high-quality zoom functionality, scale up to 2000x2000px+. Utilize clean white or transparent backgrounds to keep the focus entirely on the product. For compression, keep final assets under 200KB. Using the legacy Save for Web tool with a “High” setting for JPEGs remains a highly effective choice.
Resizing Professional Headshots
Adapt to platform standards by using a 400x400px sizing and a 1:1 aspect ratio for web profiles (like LinkedIn). However, for print or high-res needs, scale up to 1200x1200px or more, utilizing a 4:5 or 2:3 aspect ratio for portraits. Always utilize the Bicubic Sharper resampling method when reducing these dimensions to ensure facial features remain crisp and professional. Aim to keep web headshots under 100KB to prevent slow loading.
When Should You Scale Up by Outsourcing Bulk Image Resizing?
Managing high-volume web assets requires significant time and technical resources. Recognizing when to delegate bulk image resizing for websites to professional image-editing services will save time, ensure flawless quality, and keep your focus on direct marketing efforts.
If you operate an agency or a dedicated e-commerce store, handling hundreds of multi-clipping paths, background removals, drop shadows, and batch resizing tasks internally creates bottlenecks. Delegating these formatting and retouching tasks to a professional service yields a faster, more specific result for high-volume catalogs.
How to Resize Images Without Losing Quality in Photoshop FAQs
How does image optimization directly impact visual Search Engine Optimization (SEO)?
Large, unoptimized image files consume bandwidth and severely slow down page load speeds, which is a primary ranking penalty for search engines. Proper optimization improves site crawlability and ensures your visual assets rank higher in Google Images.
What is the absolute ideal file size benchmark for web images?
For standard web graphics and blog photos, the file size should stay under 100KB. For larger hero banners or high-resolution e-commerce zoom images, a maximum of 200KB to 300KB is the standard practical limit.
The Bottom Line
- Protect your original pixel data by always converting layers to Smart Objects before making any dimensional changes in Photoshop.
- Match your resampling algorithms to your specific action: use Bicubic Sharper to shrink files and Preserve Details 2.0 to enlarge them.
- Utilize Photoshop’s Export As… (adjusting JPEG quality to 5/6 or choosing PNG-8) or automate the process using CMS plugins to build a fast, visually sharp website.