

Taking a photo is challenging, right? It is more challenging to edit an image in Photoshop. Editors usually spend countless hours to give a phenomenon a look at an image. Every raw photo has some flaws. But Photoshop has everything to fix that. With every new editing challenge, Photoshop keeps upgrading, adding tools to make the process faster, easier, and less exhausting for editors.
How to fix blurry and out-of-focus photos in Photoshop is a process of restoring pixel clarity using targeted edge contrast tools because post-processing filters can salvage details lost to camera shake or missed focal points.
There is nothing more frustrating than reviewing a great shot only to realize the focus is slightly off or the whole image is blurry.
In this guide, we will show you exactly how to rescue those pictures using Photoshop. We will break down the top three reasons your photos lose sharpness and walk you through practical ways to fix them.
What are the primary causes of photo blur?
Photos can get out of focus for various reasons. If we attempt to cover every aspect of the reason, it would require page after page to complete. We are here to cover only the core three reasons for photo blur.
Camera Shake
We call this “Motion Blur.” While photographers often use it intentionally to show speed or artistic movement, it becomes a major problem when it accidentally softens your main subject. This happens when either your camera or the subject moves while the shutter is open. If your shutter speed is too slow to freeze that action, the camera records the movement as a soft, directional streak rather than a sharp detail.
How to Fix Motion Blur in Photoshop
Directional blur happens when your camera or subject moves while the shutter is open. Here is how we break down the specific fixes to restore your image.
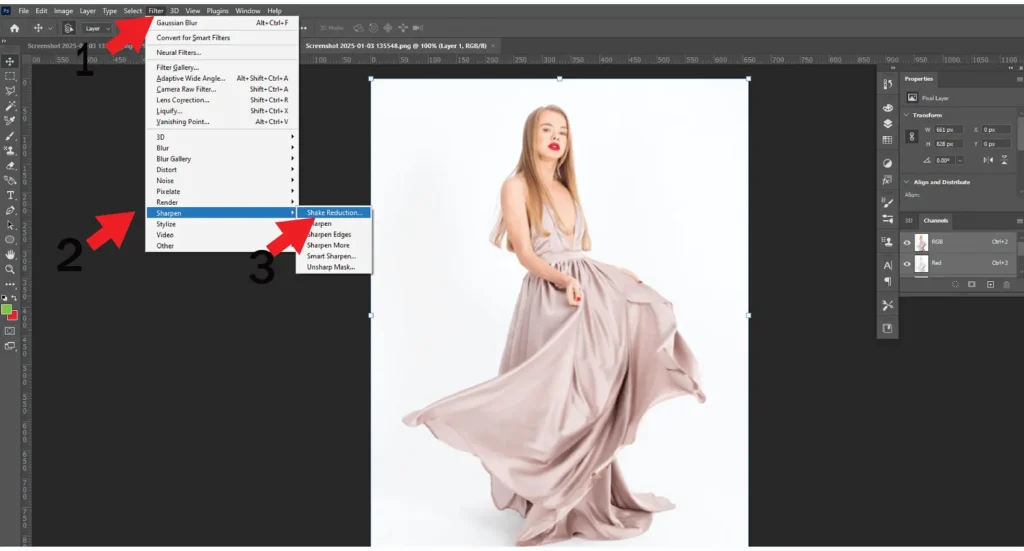
Method 1: Shake Reduction
If your main subject is obscured by standard camera shake, this automated filter is a great starting point.
- Go to Filter > Sharpen > Shake Reduction.
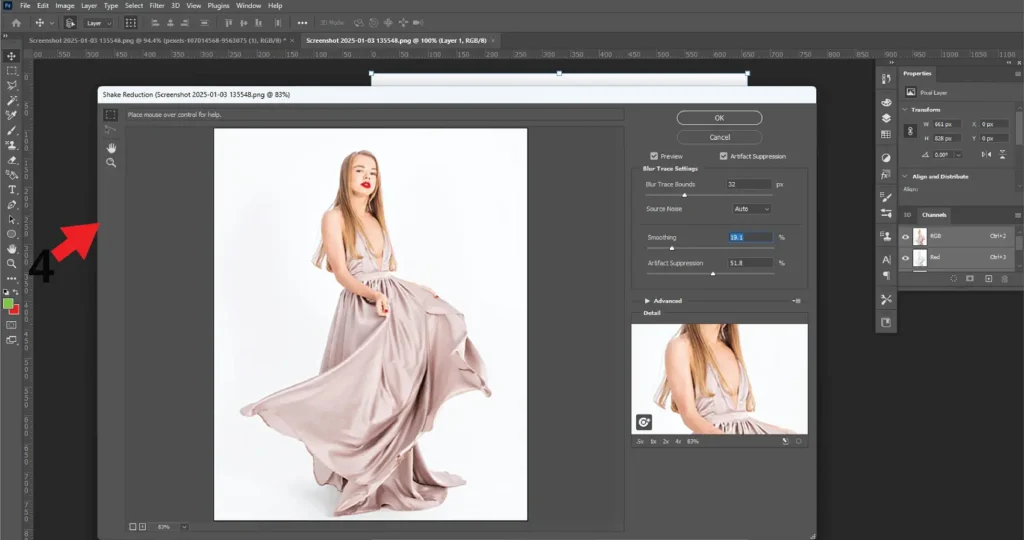
- Photoshop provides a scale where you can adjust the blur trace radius. Choose the specific section of the image where you want to remove the blur.
Note: If the movement was intense, this tool might fail to fix it completely, but it will significantly improve the baseline.
Method 2: Smart Sharpen
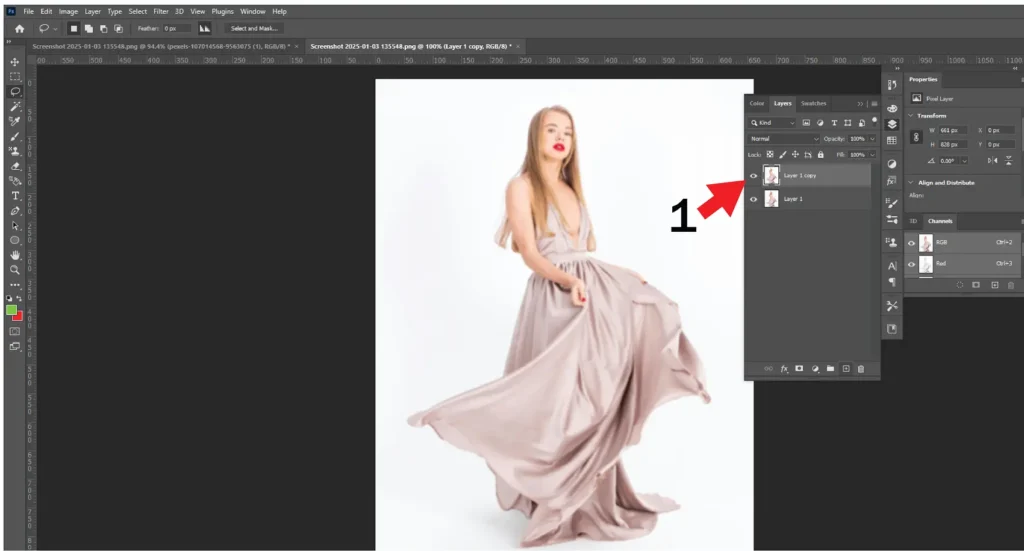
When automated tools don’t quite cut it, I rely on the Smart Sharpen tool to target the exact angle of the blur.
- Duplicate your main layer by pressing Ctrl+J (Windows) or Cmd+J (Mac).
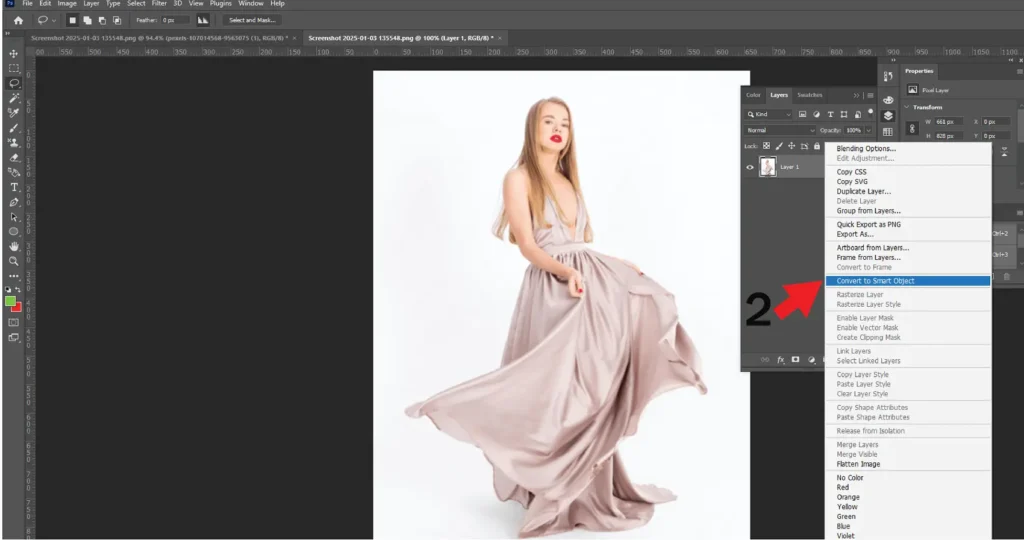
- Right-click the duplicated layer and select Convert to Smart Object.
- Go to Filter > Sharpen > Smart Sharpen.
- In the dialog box, change the “Remove” dropdown menu to Motion Blur.
- Adjust the angle to match the actual direction of the blur, then tweak the radius.
Tip: Watch your noise levels closely. Pushing the sharpness too high will introduce a heavy, grainy effect to your photo.
Method 3: Blur Gallery (Tilt-Shift)
Sometimes you need to manipulate the focus plane to disguise the blur artificially.
- Open your photo and convert the layer to a Smart Object so you can adjust the effects later.
- Go to Filter > Blur Gallery > Tilt-Shift.
- Move the blur effect’s center over your subject and adjust the feathering to blur the surrounding areas. You can rotate the tilt-shift lines to match the natural geometry of your scene. Click “OK” when the focus looks right.
Subject Movement
When your subject moves unexpectedly, your camera might lock its focus on the wrong object entirely. Nailing your camera settings on the actual shoot is the best defense, but if you’ve already taken the photo and missed the mark, Photoshop is the best way to fix it. Here is a breakdown of how to rescue that shot.
How to Fix Subject Movement
Sometimes, your subject changes position too fast, causing the camera to focus on the wrong object entirely. If the photo is already taken, Photoshop gives you a few ways to rebuild the scene.
Method 1: Content-Aware Fill
- Duplicate the layer to keep your workflow non-destructive.
- Grab the Lasso tool and carefully select the blurred portion of your object.
- Right-click the selection, choose Fill, and set the contents to Content-Aware.
- Photoshop will analyze the surroundings and attempt to patch the blurred segment.
Tip: Make sure you have the correct layers selected. I have noticed this process can be time-consuming, and if your initial Lasso selection is sloppy, you will have to redo the entire task.
Method 2: Frequency Separation
This is an advanced technique that breaks your image into separate color and texture layers, allowing you to fix hazy blur without ruining the tones.
- Duplicate your main layer.
- Go to Filter > Blur > Gaussian Blur. Adjust the radius to decrease the visual haziness.
- Create a new layer on top, right-click it, and select Create Clipping Mask.
- With the new layer selected, go to Edit > Fill and choose 50%, Gray.
- Go to Filter > Sharpen > Unsharp Mask and adjust the details to your liking. Finally, merge your layers.
Note: If you are a beginner, this method takes practice. Take it slow.
Shallow Depth
A shallow depth of field occurs when your camera focuses tightly on a single object, leaving the foreground and background entirely soft. While often used for stylistic portraits, incorrect aperture settings can accidentally blur crucial elements of your composition. If you need to recover those soft areas, here is how to adjust the focal plane and bring the rest of your image back into the limelight.
How to Fix a Shallow Depth of Field
You shoot a portrait, and the eyes are perfectly crisp, but the rest of the face is completely blurred out. This is a shallow depth of field. Here is how you can artificially bring other parts of the photo back into focus.
Method 1: Iris Blur
- Duplicate the image layer.
- Go to Filter > Blur Gallery > Iris Blur.
- Define the specific points on the image where you want the focus to be.
- Adjust the sliders to control the exact level of blurriness for each point. You can add or remove pins as needed to shape the focus.
Method 2: Lens Blur
- Duplicate the layer and go to Filter > Blur > Lens Blur.
- Choose a source map. Alpha 1 applies a basic, even blur across the image. If you want more complex, layered control, select Depth Map.
- Adjust the blur scale slider to control the intensity.
- Choose the shape of your blur (such as linear or circular). If you want the background sharp and the foreground blurred, check the Invert box.
Quick Comparison of Sharpening Tools
| Tool | Best Used For | Key Advantage |
| Smart Sharpen | Targeted blur, directional streaks | Allows you to specify the exact type of blur to remove. |
| Unsharp Mask | General softness, flat images | Quick, intuitive slider controls for immediate edge contrast. |
| Shake Reduction | Hand-held blur, slow shutter speeds | Automatically calculates and corrects the camera’s physical movement. |
| High Pass | Fine details, portraits | Leaves flat areas alone and only sharpens the physical edges of subjects. |
How do professionals avoid ruining images during sharpening?
Professionals avoid ruining images by strictly using non-destructive editing techniques like Smart Objects and layer masks. This prevents the halo effect—ugly white lines around contrast edges caused by over-sharpening—and allows editors to isolate sharpening exclusively to the main subject while keeping backgrounds soft.
The biggest rookie mistake I notice is overdoing it. You push a slider to 100% to unblur an image in Photoshop, and suddenly your subject looks like they have glowing, radioactive edges. That is the dreaded halo effect. I always use layer masks, painting with black and white brushes, to apply selective sharpening. I brush the effect onto the eyes and lips, leaving the skin and background alone.
Frequently Asked Questions (FAQ)
How do I fix blurry faces in Photoshop?
Use the Smart Sharpen tool set to Lens Blur to target out-of-focus facial features. Apply this via a layer mask so only the face gets sharpened, avoiding unnecessary digital noise reduction artifacts on the surrounding skin.
Can you completely remove motion blur from a photo?
You cannot entirely recreate missing pixels if the blur is severe, but you can significantly reduce it. Using the Smart Sharpen tool set to Motion Blur allows you to align the correction angle directly with the direction of the movement.
Why does my image look grainy after I unblur it?
Sharpening tools increase edge contrast, which inadvertently amplifies digital grain. To fix this, always utilize the ‘Reduce Noise’ slider within the sharpening dialogue box or apply the effect selectively using masks.
Bottom Line
- Identify the Blur: Before touching a slider, determine if you are dealing with camera shake, motion blur, or missed focus to choose the right tool.
- Use the Right Tool: Rely on Shake Reduction for unsteady hands, Smart Sharpen for directional blur, and the High Pass filter for crisping up portrait details.
- Protect Your Pixels: Always use Smart Objects and Layer Masks to keep your edits non-destructive and prevent the ugly halo effect.
Keep Reading: Level Up Your Editing Skills
If you found this guide helpful, check out these other step-by-step tutorials to master your Photoshop workflow and make your photos look professional:
- How to Remove Wrinkles from Clothes in Photoshop: Ruined a perfect shot because of messy fabric? Learn the fastest, most realistic ways to iron out distracting wrinkles and folds from clothing using Photoshop’s healing and cloning tools.
- How to Change the Background Color in Photoshop: Whether you need to isolate a subject or completely alter the mood of your photo, this guide breaks down the exact masking techniques you need to swap background colors seamlessly.
- The Best Background Colors for E-Commerce Photography: Stop guessing which colors actually drive sales. Discover the psychology behind e-commerce backgrounds and find out exactly which shades will make your product photos pop and convert viewers into buyers.